<?xml version="1.0" encoding="utf-8"?>
<feed xmlns="http://www.w3.org/2005/Atom">
    <title><![CDATA[Maciej Łebkowski — A professional Software Engineer]]></title>
    <link href="https://lebkowski.name/feed/atom.xml" rel="self"/>
    <link href="https://lebkowski.name/"/>
    <updated>2026-03-31T07:23:49+00:00</updated>
    <id>https://lebkowski.name/</id>
            <author>
            <name><![CDATA[Maciej Łebkowski]]></name>            <email><![CDATA[m.lebkowski@gmail.com]]></email>        </author>
        <generator uri="http://sculpin.io/">Sculpin</generator>

                <entry>
            <title type="html"><![CDATA[High-level testing: A Chargebee integration case study]]></title>
            <link href="https://lebkowski.name/high-level-testing/"/>
            <updated>2026-03-28T00:00:00+00:00</updated>
            <id>https://lebkowski.name/high-level-testing</id>
            <summary>High-level tests such as functional or acceptance suites 
aren’t that different from simple unit tests. A case study
of real-life implementation.
</summary>            <content type="html"><![CDATA[<p class="post-body__p">In a <a href="/turtle" class="post-body__a">previous article</a>, I focused on the lowest level of the test pyramid, the unit tests. Today, I’ll move to the other end of the spectrum and show some examples of how to build high-level tests.</p>

<h2 id="what-is-a-high-level-test" class="post-body__h2 post-body__heading">What is a high-level test?</h2>

<p class="post-body__p">To get it out of the way, there are multiple types of high-level tests. You might have heard names like <em class="post-body__em">functional</em>, <em class="post-body__em">acceptance</em>, <em class="post-body__em">end-to-end</em>, and more. The distinction might be important to a particular team, but it’s not relevant to this article, so I won’t focus on their differences. The common thing between them is that they are approaching a larger system as a whole, and in particular, I will be using an HTTP API as an example, and my testing surface will be the request/response level. What’s also very important is that I won’t be doing a full end-to-end test, since parts of it I will want to replace with test doubles.</p>

<p class="post-body__p">In principle, these tests aren’t that different from unit tests. That might feel controversial, but bear with me. I described the system under unit test in the following way:</p>

<p class="post-body__p"><img src="https://lebkowski.name/assets/images/high-level-testing/sut.png?61294d" alt="" class="post-body__img"></p>

<p class="post-body__p">
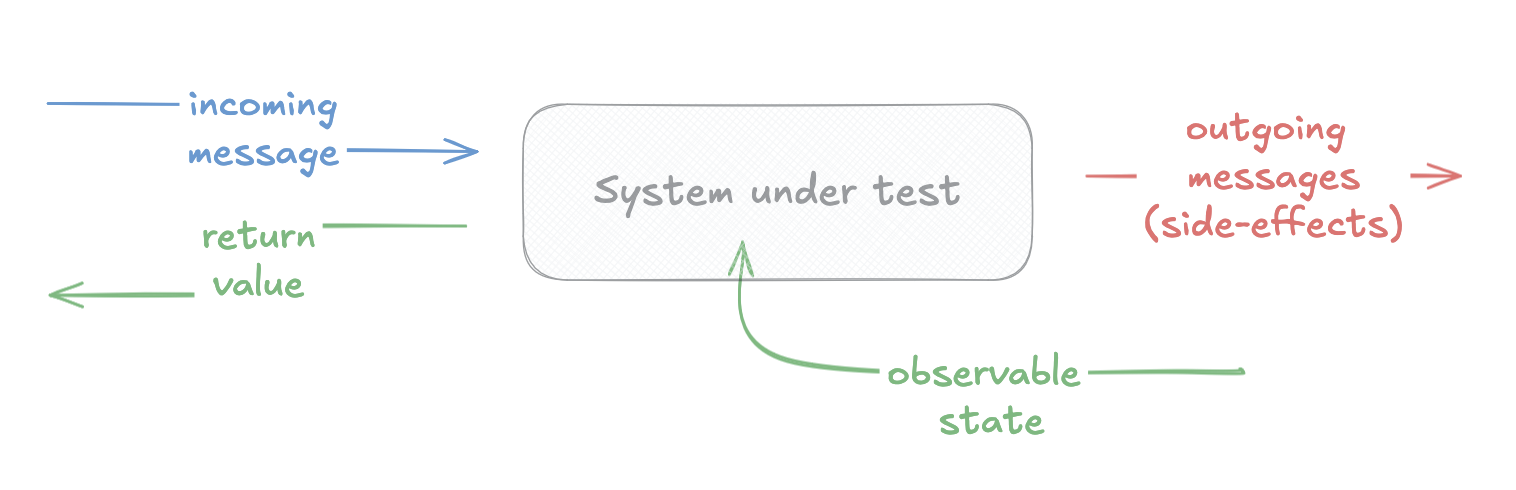
That looks similar when we treat our HTTP API Application as a black-box. Let me fill in more specific names on this same diagram:</p>

<p class="post-body__p"><img src="https://lebkowski.name/assets/images/high-level-testing/sut-http-api.png?f44f96" alt="" class="post-body__img"></p>

<p class="post-body__p">
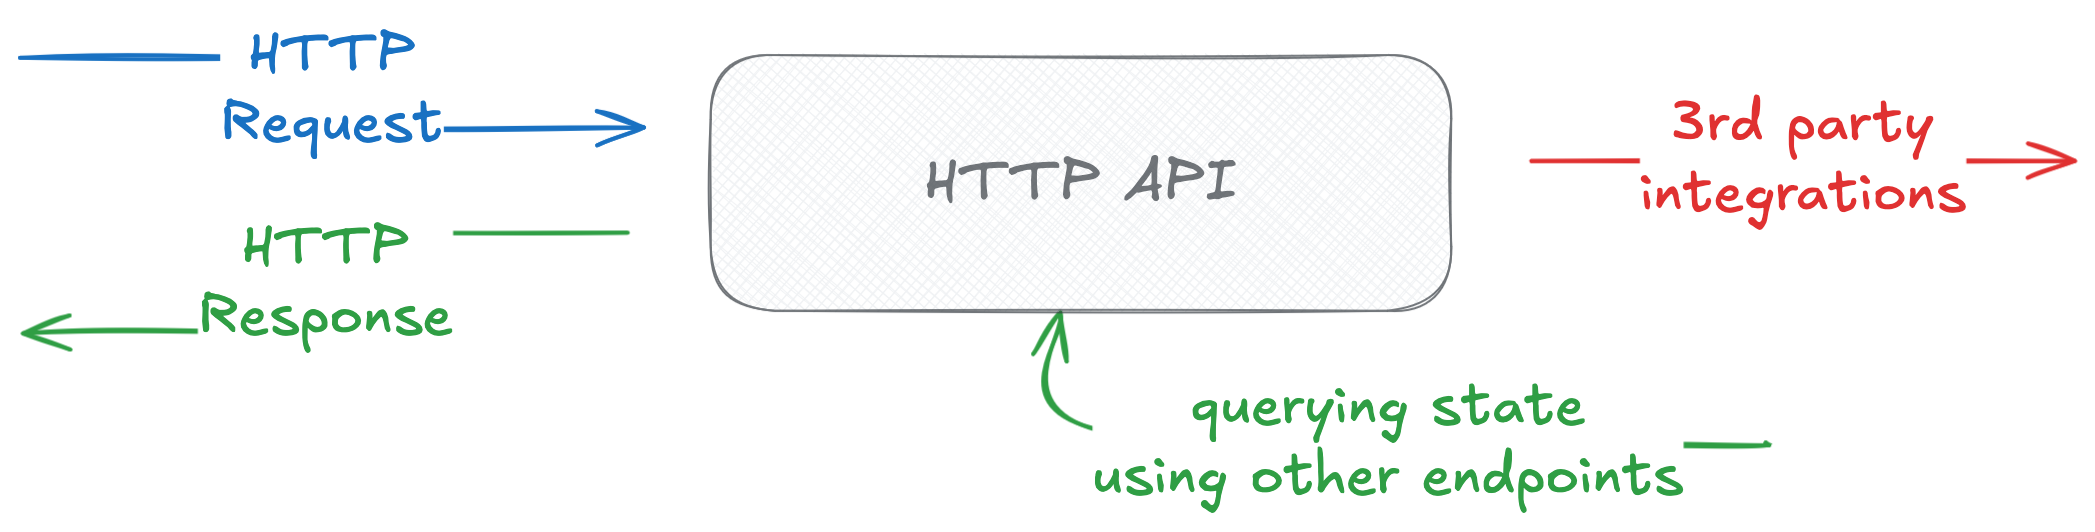
The public-facing interface of the app is an HTTP endpoint taking a request and returning a response. After changing state, for example, by creating a record, we may query the list endpoint for the same record type to verify the expected side effects (in other words, we check if the record was created). On top of that, there might be other side effects which are not as directly observed — when the app needs to communicate with a 3rd party, calling an API, sending an email, putting a message on a broker, or others.</p>

<p class="post-body__p">The model is the same, but the black-box under testing is larger.</p>

<h2 id="how-to-deal-with-a-larger-black-box" class="post-body__h2 post-body__heading">How to deal with a larger black-box?</h2>

<p class="post-body__p">This is the most crucial distinction, in my opinion. For unit tests, usually there are fewer dependencies, the context it operates on is smaller, inputs and outputs tend to be simpler, and the number of possible expected side-effects is more limited. For an HTTP API, the background context is really vast. Actually, it’s your entire application. The input/output layer is vague — it’s just an HTTP request, which seems simple — it’s just a set of headers and a request body, but that simple format can represent enormously complex scenarios. Your use cases will also probably consist of more than a single call to be meaningfull.</p>

<p class="post-body__p">This means that for a better developer experience, we need to put more effort into handling these inputs and outputs, as well as have more advanced methods of controlling the context. That’s a topic for a separate article, but I’ll just tease that it’s best to create a whole separate <em class="post-body__em">testing SDKs</em> for your app, a separate one for each of the actors interacting with your application. That might be an <code class="post-body__code">AdminSdk</code>, an <code class="post-body__code">AuthenticatedUserSdk</code>, but also  <code class="post-body__code">ChargebeeWebhookSdk</code>, or <code class="post-body__code">CronSdk</code>, or <code class="post-body__code">MessageBrokerSdk</code>. These represent different actors or agents interacting with your app, and encapsulate common behaviour (for example: the webhook SDK will automatically sign requests, so you don’t need to be bothered by it in your test case). We will use those to improve the readability and reuse of our test. Similarly, instead of making direct assertions on the HTTP response bodies or headers, it’s useful to wrap them in a dedicated assertion classes to add semantic meaning, better messages, and hide away the complexity in the tests.</p>

<p class="post-body__p">I’m not inventing an entirely new concept here. In the world of e2e testing, a similar pattern is commonly known as the <a href="https://www.selenium.dev/documentation/test_practices/encouraged/page_object_models/" class="post-body__a">Page Object Model</a>.</p>

<p class="post-body__p">You can explore <a href="https://github.com/WonderNetwork/slim-kernel-testing-harness" class="post-body__a"><code class="post-body__code">WonderNetwork/slim-kernel-testing-harness</code></a> as a library implementing these concepts.</p>

<h2 id="chargebee-case-study" class="post-body__h2 post-body__heading">Chargebee case study</h2>

<p class="post-body__p">Let’s see a practical example on how to test a real application, with some legacy problems, suboptimal architectural decisions, and a 3rd party API integration. This is based on a real modernization of a Chargebee integration I was recently performing. The app was using the <code class="post-body__code">chargebee/chargebee-php:^3</code> package, and because some orchestration around how it was used was changing, I wanted to add automated tests to have more confidence that the expected behaviour did not change.</p>

<p class="post-body__p">One of the use cases was quite simple:</p>

<blockquote class="post-body__blockquote">
  <p class="post-body__p">when a user changed their company name in the account panel, the change should be reflected in their Chargebee customer</p>
</blockquote>

<p class="post-body__p">The left part of the diagram — input/output — is quite simple. I already had a use case facade for the company administrators, which handled the authentication and exposed simple methods to call the different endpoints. I simply added another one to call the <code class="post-body__code">PATCH</code> endpoint to change the company name, and an assertion to test that the response is successful and contains the new value. Simplified, this could look something like this:</p>

<p class="post-body__p"><a href="https://gist.github.com/mlebkowski/ccc7c6bf92d04d619a310c865024f96e?file=company-scenario.php" class="post-body__a"></a></p>

<pre class="post-body__pre"><code class="post-body__code">function changeCompanyName(string $name): void {
  $response = PatchCompanyEndpointAssertion::of(
    $this-&gt;httpClient-&gt;patch('/api/company', ['name' =&gt; $name]),
  );
  $response-&gt;assertSuccessful();
  $response-&gt;assertName($name);
}
</code></pre>

<h2 id="the-right-part-of-the-diagram-is-trickier" class="post-body__h2 post-body__heading">
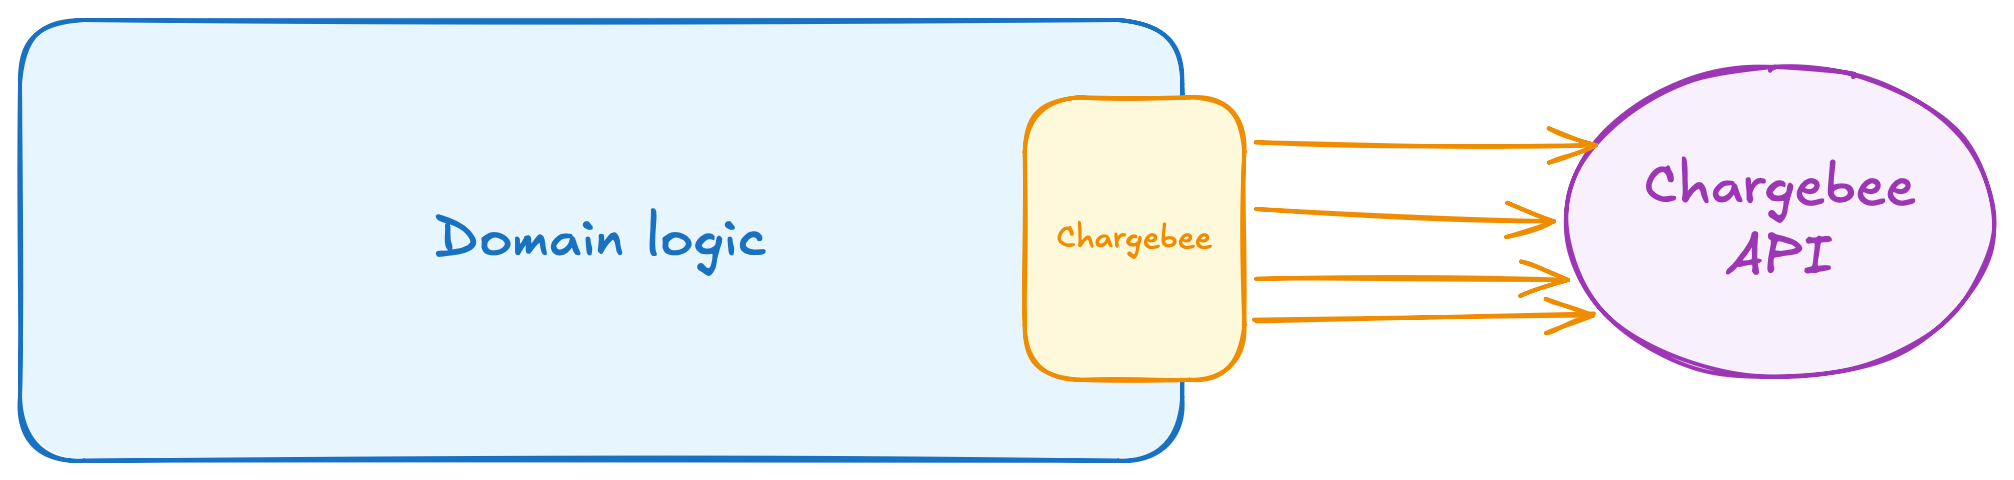
The right part of the diagram is trickier</h2>

<p class="post-body__p">The left side was easy. I can even add another check to verify the observable state, and check that the new name was persisted in the database, by querying a <code class="post-body__code">GET</code> endpoint for the company. But there are also expectations about outgoing messages: side-effects made on the Chargebee API. When writing a unit test, we would use the <a href="http://localhost:8000/turtle/#using-spies-and-testing-exceptions" class="post-body__a">spy pattern</a> to check these.</p>

<p class="post-body__p">How to inject a spy into an entire application? Well, your framework usually <a href="https://symfony.com/doc/current/testing.html#set-up-your-test-environment" class="post-body__a">affords methods to provide customized configuration for tests</a>, or even <a href="https://symfony.com/doc/current/testing.html#mocking-dependencies" class="post-body__a">mock some of the dependencies at runtime</a>, so that’s not a problem.</p>

<p class="post-body__p">Unfortunately, the default way of configuring and using Chargebee in the v3 SDK is by registering a static, global <code class="post-body__code">Environment</code> instance. This allows you to then call different endpoints all across your codebase, without using dependency injection. And this was the case for my application as well.</p>

<p class="post-body__p">The next best thing would be to replace the HTTP client used by the SDK and provide a <a href="https://docs.guzzlephp.org/en/stable/testing.html" class="post-body__a">mock handler</a>, but the package hardcoded the calls and didn’t expose a way of doing that either.</p>

<p class="post-body__p">To start, this is how my app looked from a helicopter view:</p>

<p class="post-body__p"><img src="https://lebkowski.name/assets/images/high-level-testing/chargebee-static.png?41a685" alt="" class="post-body__img"></p>

<h2 id="isolate-all-calls-to-a-single-facade" class="post-body__h2 post-body__heading">
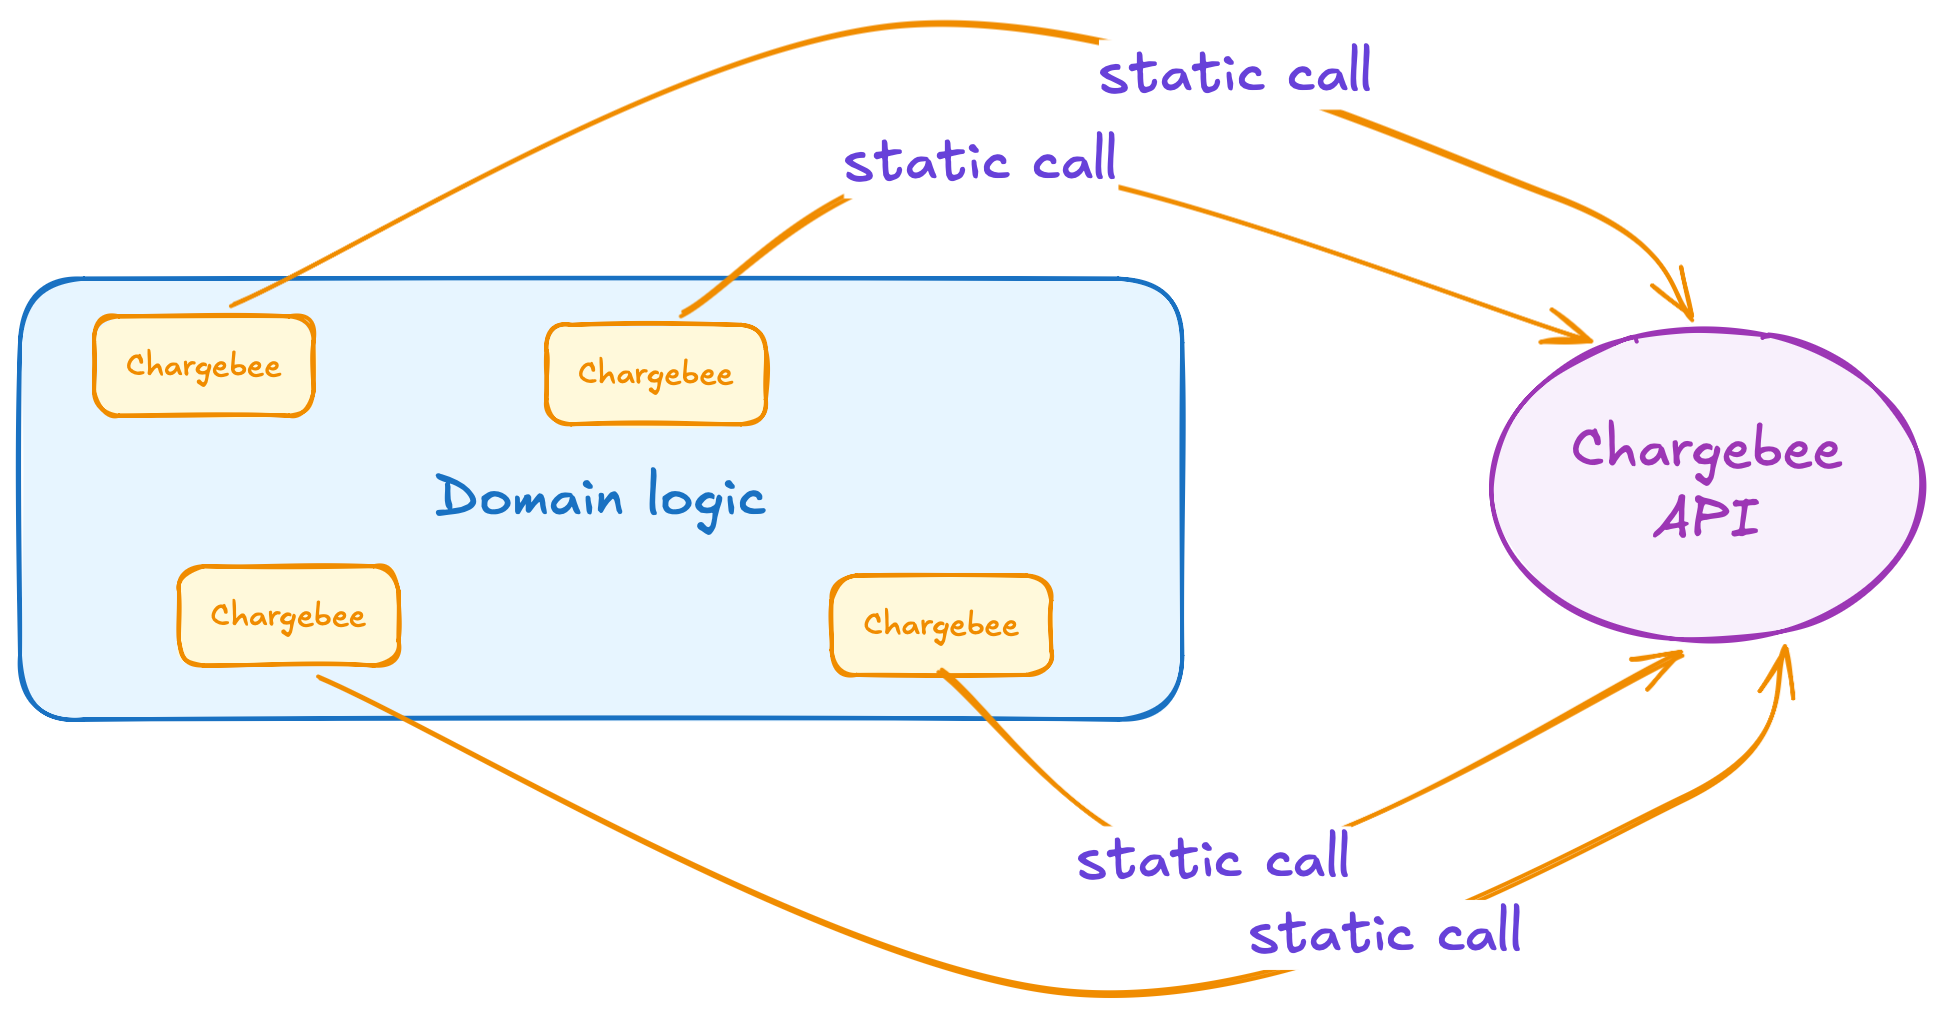
Isolate all calls to a single facade</h2>

<p class="post-body__p">There was no practical way of replacing the Chargebee integration with a test double. The first order of business was to improve that situation. Instead of making these calls <em class="post-body__em">ad hoc</em> in any class, the goal was to <strong class="post-body__strong">move all the uses of Chargebee endpoints to a single facade</strong>, which then could be replaced with a test double.</p>

<p class="post-body__p">There was a lot of moving around, and along the way, I needed to separate any business logic around those calls. The goal is to replace that facade in tests, so I wanted as little business logic to be mocked, and preferably <em class="post-body__em">only the Chargebee integration</em>.</p>

<p class="post-body__p">The final result looked something like this:</p>

<p class="post-body__p"><img src="https://lebkowski.name/assets/images/high-level-testing/chargebee-sdk.png?d6abab" alt="" class="post-body__img"></p>

<p class="post-body__p">All the calls are grouped in one place. I specifically placed it on the edge of the domain area, because <a href="https://www.wikiwand.com/en/Hexagonal_architecture_(software)#Principle" class="post-body__a">it’s a port</a> — a window our application can explicitly use to communicate with the outside world. And through that window, we can pass in different adapters. It will be a Chargebee API client for production, but an in-memory test double for our high-level test:</p>

<p class="post-body__p"><img src="https://lebkowski.name/assets/images/high-level-testing/chargebee-test-double.png?e1f171" alt="" class="post-body__img"></p>

<h2 id="implementing-the-test-double" class="post-body__h2 post-body__heading">
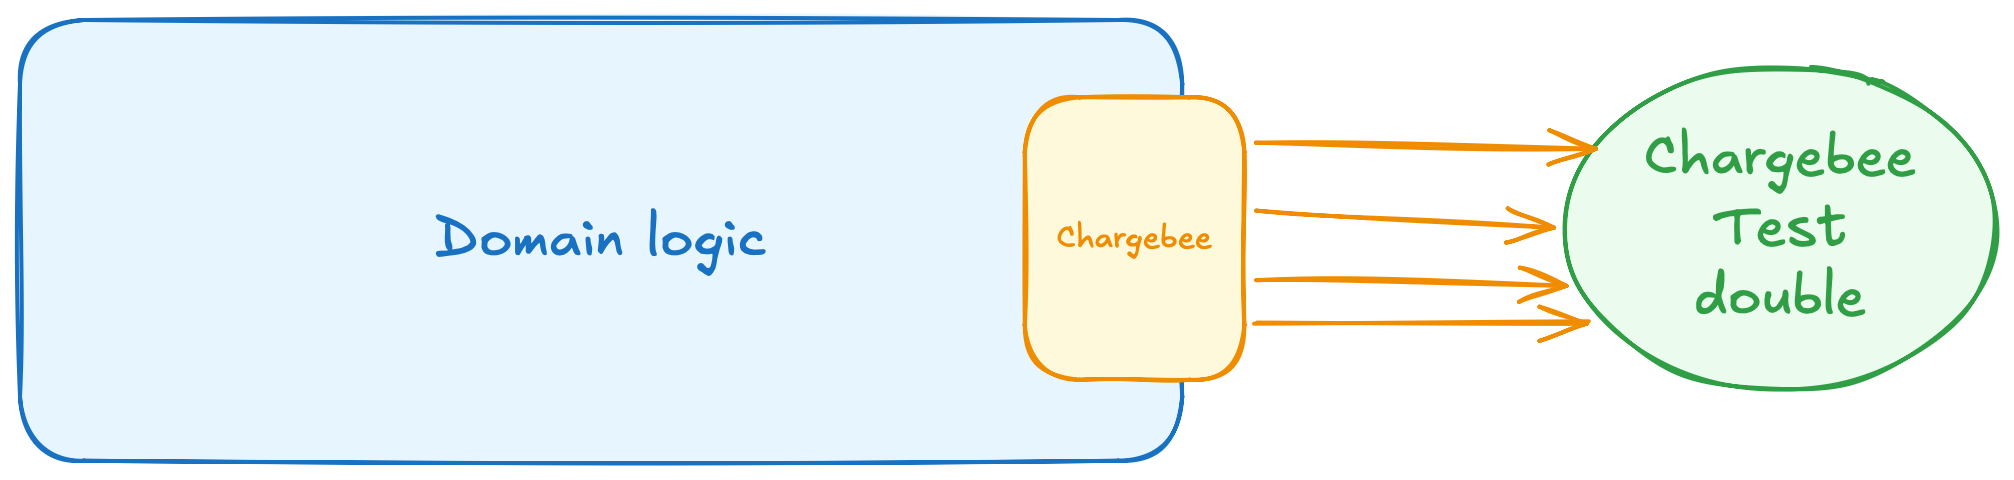
Implementing the test double</h2>

<p class="post-body__p">The previous efforts allowed me to finally replace a single dependency in my test environment to mock all the communication with Chargebee. This isn’t a simple task, because not only are there many methods exposed on that facade (both the actual API and the test double split their responsibility into many different classes), but we also need to accurately simulate the real API behaviour and state changes. The better we do it, the more reliable our test will become.</p>

<p class="post-body__p">As an example, for our company name change use case, here’s a partial implementation that would allow us to finish the test:</p>

<p class="post-body__p"><a href="https://gist.github.com/mlebkowski/ccc7c6bf92d04d619a310c865024f96e?file=chargebee-customer-endpoint-test-double.php" class="post-body__a"></a></p>

<pre class="post-body__pre"><code class="post-body__code">final class ChargebeeCustomerEndpointTestDouble {
  private array $customers = [];

  public function givenCustomerExists(Customer $customer): void {
    $this-&gt;customers[$customer-&gt;id] = $customer;
  }

  public function updateCustomer(CustomerId $id, CustomerChangePayload $change): void {
    $this-&gt;customers[$id-&gt;value] = $this-&gt;get($id)-&gt;withName($change-&gt;name);
  }

  public function get(CustomerId $id): Customer {
    return $this-&gt;customers[$id-&gt;value] ?? throw new CustomerNotFoundException();
  }
}
</code></pre>

<p class="post-body__p">The first method is an internal one used only in tests. It allows us to short-circuit our scenario and start it in a hypothetical situation where the customer already exists, instead of going through all the steps from the start. A different team might very well choose not to use shortcuts and simulate the entire journey, starting with a blank slate.</p>

<p class="post-body__p">The following two methods are used by the facade, or maybe they are even part of the interface, i.e., they are called by our domain code. They are responsible for recreating the same logic that happens when we call the Chargebee API. In an advanced use case, this would be more complicated: for example, it would allow you to simulate exceptional conditions, errors, missing data, etc.</p>

<p class="post-body__p">Putting that test double into the test container, our test case can be completed.</p>

<p class="post-body__p"><a href="https://gist.github.com/mlebkowski/ccc7c6bf92d04d619a310c865024f96e?file=company-name-test.php" class="post-body__a"></a></p>

<pre class="post-body__pre"><code class="post-body__code">#[Test]
function companyNameChangeIsReflectedInChargebee(): void {
   // given we set up the pre-existing context:
   $companyScenario = $this-&gt;companyUseCase-&gt;givenCompanyExists("Evil Corp");
   $this-&gt;chargebeeUseCase-&gt;givenCustomerExists(
     new Customer(
       id: $companyScenario-&gt;companyId, 
       name: "Evil Corp",
     ),
   );
   // when the API is called
   $companyScenario-&gt;changeCompanyName("Acme");
   // then expect the side-effect was produced by inspecting our test double
   $actual = $this-&gt;chargebeeUseCase-&gt;getCustomer($customer-&gt;companyId);
   self::assertSame("Acme", $actual-&gt;name);
}
</code></pre>

<h2 id="testing-one-last-assumption" class="post-body__h2 post-body__heading">Testing one last assumption</h2>

<p class="post-body__p">The test case shows that given some context (customer exists), when an input is applied (HTTP request to the correct API endpoint), a response is produced, and some state change can be observed (response from a separate endpoint), and a side-effect was produced on a Chargebee port. But I explicitly excluded the real implementation of the 3rd party integration from this scenario. I can be confident that 95% of the code works, but I have no idea if the last part is correct.</p>

<p class="post-body__p">Let’s flip the scenario and test the SDK itself. Remember, it didn’t allow us to provide a test double for the HTTP client, so we’ll resort to using a real API. Well, kind of. <a href="https://wiremock.org/" class="post-body__a">WireMock</a> is great at pretending to be the real thing. It allows us to register a set of mappings — a collection of endpoints and a list of conditions to match a request — and associate them with
predefined responses. For all intents and purposes, we can make WireMock behave exactly the same as the Chargebee API for the inputs we give it.</p>

<p class="post-body__p">By placing a <a href="https://proxyman.com/" class="post-body__a">capturing proxy</a> in front of my application, I was able to methodically collect all the real requests and responses the system makes to the Chargebee API, and use them in an integration test of the SDK I implemented, cementing its behaviour.</p>

<p class="post-body__p"><img src="https://lebkowski.name/assets/images/high-level-testing/chargebee-wiremock.png?6aa957" alt="" class="post-body__img"></p>

<p class="post-body__p">
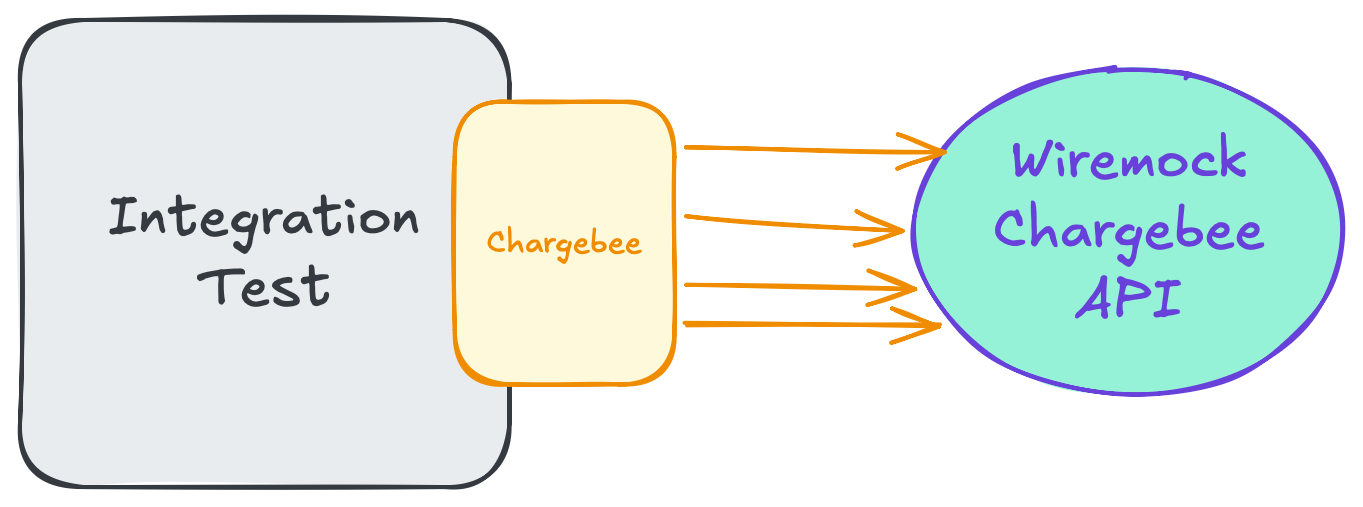
With this pair of tests:</p>

<ul class="post-body__ul">
<li class="post-body__li">One high-level, using a Chargebee Test Double, covering 95% of the application’s „<em class="post-body__em">area</em>”</li>
<li class="post-body__li">And a second one on a lower level, targeting just a single unit and a very fast mock API</li>
</ul>

<p class="post-body__p">We have covered the entirety of the code paths required for our feature.</p>

<h2 id="final-bonus" class="post-body__h2 post-body__heading">Final bonus</h2>

<p class="post-body__p">After all of the above was done, and I could be pretty certain my application works as intended, I moved one step further. I upgraded the deprecated version 3 of the Chargebee SDK package. At this point, it was fairly easy because of the following facts:</p>

<ul class="post-body__ul">
<li class="post-body__li">All usages of the <code class="post-body__code">ChargeBee\</code> namespace was limited to my one facade, so I knew all the changes would be contained to that one place (yes, I mapped all of the inputs and outputs of my facade to my own value objects).</li>
<li class="post-body__li">The new package version had some implementation changes, but it still used the same API, so I knew the inputs and outputs were the same, and the HTTP calls were also unchanged.</li>
</ul>

<p class="post-body__p">After I reimplemented the facade (Chargebee v4 is quite a breaking change, as it fundamentally changes the architecture of the SDK), I was able to rerun the integration test, expecting it to pass with flying colors. After fixing two mistyped parameters, I confirmed exactly that: the documented behaviours were exactly the same when using the v4 implementation, and I could safely merge that change too.</p>

<h2 id="closing-thoughts" class="post-body__h2 post-body__heading">Closing thoughts</h2>

<p class="post-body__p">As you were able to see, a high-level test doesn’t need to be that different from a unit test. There is more boilerplate to keep it manageable, and to hide away the complexity and area of the affected context, but in the end, the test case follows the same principles:</p>

<ul class="post-body__ul">
<li class="post-body__li">Arrange (prepare a bunch of stuff), Act (execute our scenario), Assert (check for its effects)</li>
<li class="post-body__li">We check responses, we check observable state change, and we check side-effects produced on the outside of our black-box, but we never need to look inside it</li>
</ul>

<p class="post-body__p">If you haven’t already, you can read more of my <a href="/testing" class="post-body__a">articles about testing</a>, including some other case studies, or a detailed chapter focusing on unit tests. And if you need that kind of support, find out <a href="/offer/consulting" class="post-body__a">how I can help your project</a>.</p>
]]></content>
        </entry>
            <entry>
            <title type="html"><![CDATA[Linkedin is not worth my time]]></title>
            <link href="https://lebkowski.name/bye-linkedin/"/>
            <updated>2025-03-21T00:00:00+00:00</updated>
            <id>https://lebkowski.name/bye-linkedin</id>
                        <content type="html"><![CDATA[<p class="post-body__p">I have used LinkedIn heavily for the past couple of years. I think it was around 2017-ish, the time when I <a href="https://lebkowski.name/assets/images/linkedin/hr-cover-letter.pdf?d156f9" class="post-body__a">turned my career around to become an HR intern</a>, that I started viewing that site as something more than a reverse tinder, where women try to attract men, who then ignore them.</p>

<p class="post-body__p">Over the course of a few years I learned how to get the best of LinkedIn as a social media platform. I actively shaped my feed, deciding who to follow, who to ignore, and who to ban without a second thought. During this time I gave this advice to a lot of people concerned about the quality of the posts the algorithm feeds them:</p>

<blockquote class="post-body__blockquote">
  <p class="post-body__p">You need to put effort into selecting what goes and what leaves your front page. If you don’t, you’ll be at the mercy of LinkedIn algorithm, and it tends to promote mediocre content, click-bait articles, and shallow interactions.</p>
</blockquote>

<p class="post-body__p">I was listening to my own advice. And for a long time, I was getting really good quality from my interactions most of the time. I met so many interesting people, learned about their experiences, challenged my ideas in lengthy discussions. I had followed a lot of diverse people. Some of them were using the platform to build an audience, and they weren’t hiding the fact that their presence there is a business strategy and there are monetaty incentives behind it for them. Regardless of that, they were able to entertain their readers with interesting content that wasn’t spoiled by the commercial nature of their author’s presence.</p>

<p class="post-body__p">At the same time I wasn’t shy to call out anyone on the crap they posted for attention and internet points. I was told on multiple occassions, both offline and online, that a person loves reading my comments due to my sensitive bullshit filter, witty humor, and valuable insights.</p>

<p class="post-body__p">As it turns out, I enjoyed my time there so much, that <a href="https://arstechnica.com/gadgets/2023/06/reddit-api-changes-are-imminent-heres-whats-happening-to-your-favorite-apps/" class="post-body__a">after reddit imploded on itself in July 2023</a>, it became not only my primary social media platform, but for all intents and purposes, the only one I used regularly. And believe me when I say I tried various options, including a brief return to <a href="https://www.wikiwand.com/en/articles/Usenet" class="post-body__a">Usenet</a> after 25 years (yeah, it’s mostly dead, if you don’t count the trolls).</p>

<p class="post-body__p">Unfortunately recently my impression of the platform has changed. I couldn’t keep up with plowing weeds out of my feed, and at one point I decided to make an experiment: I abruptly stopped using it. Weeks went by without me even so much as touching the app on my phone. The screen time dropped from being the second most used app to zero. And I wasn’t missing it at all.</p>

<p class="post-body__p">After a while my relation with the platform became more casual. I checked notifications once every few days (mostly learning nothing interesting), and scrolled it a bunch, mostly because I had nothing better to do in a given moment.</p>

<p class="post-body__p">Recently I came to a sad realization: my feed is again filled with pompous statemens of self-righteous experts who spill half-truths or outright bullshit left and right, either caused by their incompetence or their relentless eagerness to sell you their consulting services. With all the interesting stuff I once encountered here (and is still somewhere out there if I could just filter it out from the noise), I feel too old to be correcting people on the internet.</p>

<p class="post-body__p"><a href="https://xkcd.com/386/ssss" class="post-body__a"><img src="https://lebkowski.name/assets/images/linkedin/duty-calls.png?42e15e" alt="Duty Calls" class="post-body__img"></a></p>

<p class="post-body__p">So long for now, LinkedIn, it was a fun ride but it’s time to stop.</p>
]]></content>
        </entry>
            <entry>
            <title type="html"><![CDATA[Remote sudo password using 1password (or any other password manager)]]></title>
            <link href="https://lebkowski.name/sudo/"/>
            <updated>2025-02-23T00:00:00+00:00</updated>
            <id>https://lebkowski.name/sudo</id>
            <summary>Using your local password manager to authenticate with remote sudo over ssh</summary>            <content type="html"><![CDATA[<p class="post-body__p">Having a local, secure and passwordless sudo is easy, especially <a href="https://apple.stackexchange.com/questions/259093/can-touch-id-on-mac-authenticate-sudo-in-terminal" class="post-body__a">with apples built in biometrics support</a>. But what if most of your sudo prompts are on a remote machine you ssh into? Well, we can set this up too.</p>

<h2 id="prerequisites" class="post-body__h2 post-body__heading">Prerequisites</h2>

<ul class="post-body__ul">
<li class="post-body__li">We have a set of target hosts we SSH into and escalate our privileges using sudo, which requires a password</li>
<li class="post-body__li">You have some kind of secure password manager on your local machine. I’ll be using 1password on a mac, but the solution is more general than that.</li>
</ul>

<h2 id="the-problem" class="post-body__h2 post-body__heading">The problem</h2>

<p class="post-body__p">Our initial setup looks like this:</p>

<ul class="post-body__ul">
<li class="post-body__li">We SSH into a remote machine</li>
<li class="post-body__li">Call <code class="post-body__code">sudo whatever</code></li>
<li class="post-body__li">We need to type a password</li>
</ul>

<p class="post-body__p"><img src="https://lebkowski.name/assets/images/sudo/initial.svg?6cde2a" alt="" class="post-body__img"></p>

<p class="post-body__p">And our target architecture is the following:</p>

<ul class="post-body__ul">
<li class="post-body__li">We SSH into a remote machine</li>
<li class="post-body__li">Call <code class="post-body__code">sudo --askpass whatever</code></li>
<li class="post-body__li">Behind the scenes, your password manager is queried for password, and you grant access using your regular method, and it gets delivered to sudo</li>
</ul>

<p class="post-body__p">I don’t want to spoil too much, but our solution will include defining <code class="post-body__code">SUDO_ASKPASS</code>, an askpass script, ssh tunnel between two separate sockets, a script to talk to the password manager and a sprinkle of some configuration on top. Let’s get to it.</p>

<p class="post-body__p"><img src="https://lebkowski.name/assets/images/sudo/target.svg?1e148d" alt="" class="post-body__img"></p>

<h2 id="creating-a-script-to-print-the-password-on-stdout" class="post-body__h2 post-body__heading">Creating a script to print the password on <code class="post-body__code">stdout</code></h2>

<p class="post-body__p">This is the simples part. Just use whatever scripting or compiled language to fetch a specific password from your vault and dump it to standard output. I use 1password, so I’ll make use of <a href="https://developer.1password.com/docs/cli/get-started/" class="post-body__a">1Password CLI</a> utility called <code class="post-body__code">op</code>:</p>

<p class="post-body__p"><a href="https://gist.github.com/mlebkowski/5787e55f130ab1af55f34ed548db8784?file=op-sudo.sh" class="post-body__a"></a></p>

<pre class="post-body__pre"><code class="post-body__code">#!/usr/bin/env bash

main() {
  declare account="$1" uuid="$2" field="${3:-password}"
  /opt/homebrew/bin/op read --account "$account" "op://Employee/$uuid/$field"
}

main "$@"
</code></pre>

<p class="post-body__p">Since the script will not be executed from my login shell, I passed the full path to the op binary (as found by <code class="post-body__code">command -v op</code>), because my <code class="post-body__code">$PATH</code> settings will not be present in that context.</p>

<p class="post-body__p">I have my password saved in a work account, so my default vault is named <code class="post-body__code">Employee</code>. I got the item uuid from 1Password app. You can learn more about <a href="https://developer.1password.com/docs/cli/secret-reference-syntax/" class="post-body__a">secret reference syntax</a> to adjust to your context.</p>

<p class="post-body__p">Let’s confirm that it works. After I saved this to <code class="post-body__code">~/bin/op-sudo.sh</code> and adding necessary permisions <code class="post-body__code">chmod a+x op-sudo.sh</code>:</p>

<p class="post-body__p"><img src="https://lebkowski.name/assets/images/sudo/op-sudo.png?818b83" alt="" class="post-body__img"></p>

<p class="post-body__p">Everything works fine. The password manager asks me for confirmation first, and the password is printed on stdout.</p>

<h2 id="setting-up-a-launchagent-inetd-to-listen-on-a-socket" class="post-body__h2 post-body__heading">Setting up a LaunchAgent (inetd) to listen on a socket</h2>

<p class="post-body__p">This next part will create a local socket, that will map to the script we just created. On linux machines there was this thing called <a href="https://www.wikiwand.com/en/articles/Inetd" class="post-body__a"><code class="post-body__code">inetd</code></a> which opened a port for us, listened for connections, and mapped the script’s stdio to the socket. Today, I guess <a href="https://www.freedesktop.org/software/systemd/man/latest/systemd.socket.html" class="post-body__a">systemd can do that</a>, and here’s <a href="https://mgdm.net/weblog/systemd-socket-activation/" class="post-body__a">a person describing how to set that up</a>.</p>

<p class="post-body__p">I am using a macOs machine instead, so I will create a <a href="https://developer.apple.com/library/archive/documentation/MacOSX/Conceptual/BPSystemStartup/Chapters/CreatingLaunchdJobs.html" class="post-body__a">LaunchAgent</a> instead. LaunchAgents use a very similar concept, but they are configured via XML instead. Fill in some blanks in the following config and save it in <code class="post-body__code">~/Library/LaunchAgents</code> with a <code class="post-body__code">plist</code> extension. I used the name <code class="post-body__code">pl.narzekasz.op-sudo.plist</code>.</p>

<p class="post-body__p"><a href="https://gist.github.com/mlebkowski/5787e55f130ab1af55f34ed548db8784?file=pl.narzekasz.op-sudo.plist" class="post-body__a"></a></p>

<pre class="post-body__pre"><code class="post-body__code">&lt;?xml version="1.0" encoding="UTF-8"?&gt;
&lt;!DOCTYPE plist PUBLIC "-//Apple Computer//DTD PLIST 1.0//EN" "http://www.apple.com/DTDs/PropertyList-1.0.dtd"&gt;
&lt;plist version="1.0"&gt;
&lt;dict&gt;
    &lt;key&gt;Disabled&lt;/key&gt;
    &lt;false/&gt;
    &lt;key&gt;Label&lt;/key&gt;
    &lt;string&gt;pl.narzekasz.op-sudo.35s524did7b74qggqeoqbetpee&lt;/string&gt;
    &lt;key&gt;ProgramArguments&lt;/key&gt;
    &lt;array&gt;
        &lt;string&gt;/Users/puck/bin/op-sudo.sh&lt;/string&gt;
        &lt;string&gt;WonderNetwork&lt;/string&gt;
        &lt;string&gt;35s524did7b74qggqeoqbetpee&lt;/string&gt;
    &lt;/array&gt;
    &lt;key&gt;inetdCompatibility&lt;/key&gt;
    &lt;dict&gt;
        &lt;key&gt;Wait&lt;/key&gt;
        &lt;false/&gt;
    &lt;/dict&gt;
    &lt;key&gt;InitGroups&lt;/key&gt;
    &lt;true/&gt;
    &lt;key&gt;Sockets&lt;/key&gt;
    &lt;dict&gt;
        &lt;key&gt;Listeners&lt;/key&gt;
        &lt;dict&gt;
            &lt;key&gt;SockPathMode&lt;/key&gt;
            &lt;integer&gt;384&lt;/integer&gt;
            &lt;key&gt;SockPathName&lt;/key&gt;
            &lt;string&gt;/Users/puck/.op-sudo/wondernetwork.sock&lt;/string&gt;
            &lt;key&gt;SockType&lt;/key&gt;
            &lt;string&gt;stream&lt;/string&gt;
        &lt;/dict&gt;
    &lt;/dict&gt;
&lt;/dict&gt;
&lt;/plist&gt;
</code></pre>

<p class="post-body__p">There are some key placeholders there you need to pay attention to:</p>

<ul class="post-body__ul">
<li class="post-body__li">I used a pl.narzekasz.pl.op-sudo.{id} Label, because I anticipate I might have more such configurations to serve different passwords. This does not matter that much.</li>
<li class="post-body__li"><p class="post-body__p">The ProgramArguments is an array representing the command invokation, so it contains the full path to the script as well as its arguments (1password account and item uuid). There’s nothing stopping you to call <code class="post-body__code">op</code> directly here instead of having an intermediate script:</p>

<pre class="post-body__pre"><code class="post-body__code">&lt;string&gt;/opt/homebrew/bin/op&lt;/string&gt;
&lt;string&gt;--account&lt;/string&gt;
&lt;string&gt;WonderNetwork&lt;/string&gt;
&lt;string&gt;read&lt;/string&gt;
&lt;string&gt;op://Employee/{place-your-id-here}/{field}&lt;/string&gt;
</code></pre></li>
<li class="post-body__li"><p class="post-body__p">And at the bottom there’s <code class="post-body__code">SocketPathName</code> defining a path to the unix domain socket that will be used to listen for incomming connections. Make sure to create the directory first, or the agent won’t start: <code class="post-body__code">mkdir /Users/puck/.op-sudo</code></p></li>
</ul>

<p class="post-body__p">Finally, we need to launch the agent:</p>

<pre class="post-body__pre"><code class="post-body__code">launchctl load ~/Library/LaunchAgents/pl.narzekasz.op-sudo.plist
</code></pre>

<p class="post-body__p">And I will use <code class="post-body__code">socat</code> to confirm that I can get the password using the specified socket:</p>

<p class="post-body__p"><img src="https://lebkowski.name/assets/images/sudo/socat.png?988991" alt="" class="post-body__img"></p>

<h2 id="creating-a-tunnel-to-the-socket" class="post-body__h2 post-body__heading">Creating a tunnel to the socket</h2>

<p class="post-body__p">Now, we need to somehow transfer that socket to the remote host. Fortunately, we can simply use ssh remote forwarding for that. I will quickly show how to do that by opening a TCP port of target machine, which is less secure, because every user on that system will be able to access it. That’s not a huge issue, since the script asks for confirmation each time, but it’s better if we can avoid that.</p>

<h3 id="using-a-tcp-port" class="post-body__h3 post-body__heading">Using a TCP port</h3>

<p class="post-body__p">The way we connect would be:</p>

<pre class="post-body__pre"><code class="post-body__code">ssh -R 7825:/Users/puck/.op-sudo/wondernetwork.sock target-host
</code></pre>

<p class="post-body__p"><img src="https://lebkowski.name/assets/images/sudo/ssh-tcp.png?f2ea25" alt="" class="post-body__img"></p>

<p class="post-body__p">We’re good to go.</p>

<h3 id="using-a-unix-domain-socket" class="post-body__h3 post-body__heading">Using a Unix Domain socket</h3>

<p class="post-body__p">Let’s do that properly and permanently instead. Add the remote forwarding instruction to your <code class="ssh post-body__code">/config</code> for target host or group. And here’s the part where you can set up multiple launch agents, serving different passwords, listening on different sockets, forwarded to different remote machines.</p>

<pre class="post-body__pre"><code class="post-body__code">Host narzekasz.pl
  RemoteForward /home/puck/.ssh/op-sudo.sock /Users/puck/.op-sudo/wondernetwork.com
</code></pre>

<p class="post-body__p">We can confirm that this still works:</p>

<p class="post-body__p"><img src="https://lebkowski.name/assets/images/sudo/ssh-socket.png?245dca" alt="" class="post-body__img"></p>

<p class="post-body__p">There is one catch. The remote socket won’t be cleaned up by the <code class="post-body__code">sshd</code> after you disconnect, so a dead socket file will be left in the filesystem. And next time you try to connect: sshd will bail, because the target path already exists. This behaviour can be overriden using the <a href="https://unix.stackexchange.com/a/414376/16278" class="post-body__a"><code class="post-body__code">StreamLocalBindUnlink</code></a> option, unfortunately, this needs to be set in the <code class="post-body__code">sshd_config</code> of the <em class="post-body__em">target host</em>, which might be out of reach in many situations.</p>

<h2 id="final-piece-of-the-puzzle-sudo-askpass" class="post-body__h2 post-body__heading">Final piece of the puzzle: <code class="post-body__code">sudo-askpass</code></h2>

<p class="post-body__p">Finally, we need to tie this together with sudo on the remote host. We can use the <a href="https://stackoverflow.com/questions/12608293/how-to-setup-a-sudo-askpass-environment-variable" class="post-body__a"><code class="post-body__code">SUDO_ASKPASS</code></a> environment variable for this. First, let’s save a script that reads from our forwarded unix domain socket. You can use either netcat (<code class="post-body__code">nc</code>) or <a href="https://github.com/3ndG4me/socat" class="post-body__a"><code class="post-body__code">socat</code></a> for that, whatever is more convenient for you:</p>

<p class="post-body__p"><a href="https://gist.github.com/mlebkowski/5787e55f130ab1af55f34ed548db8784?file=sudo-askpass.sh" class="post-body__a"></a></p>

<pre class="post-body__pre"><code class="post-body__code">#!/usr/bin/env bash

has-command() {
  command -v "$1" &gt;/dev/null 2&gt;&amp;1
}

main() {
  SOCKET="$(realpath ~/.ssh/op-sudo.sock)"
  if has-command nc; then
    echo | nc -U "$SOCKET"
  elif has-command socat; then
    socat stdio "UNIX-CONNECT:$SOCKET"
  else
    echo "Type the passwords your own self" &gt;&amp;2
    return 1
  fi
}

main "$@"
</code></pre>

<p class="post-body__p">Save it to wherever, say <code class="post-body__code">~/bin/sudo-askpass</code> (remember to <code class="post-body__code">chmod a+x ~/bin/sudo-askpass</code>) and configure it in your <code class="bashrc post-body__code"></code>, <code class="zshrc post-body__code"></code> or similar:</p>

<pre class="post-body__pre"><code class="post-body__code">export SUDO_ASKPASS=~/bin/sudo-askpass
</code></pre>

<p class="post-body__p">Enjoy! Remember to run your sudo with <code class="post-body__code">--askpass</code> option!</p>

<p class="post-body__p"><img src="https://lebkowski.name/assets/images/sudo/sudo-askpass.gif?429975" alt="" class="post-body__img"></p>

<p class="post-body__p">Please leave likes and comments below to let me know if you enjoyed this instruction or have anything to improve</p>
]]></content>
        </entry>
            <entry>
            <title type="html"><![CDATA[Building a secure API Token mechanism]]></title>
            <link href="https://lebkowski.name/api-tokens/"/>
            <updated>2025-02-03T00:00:00+00:00</updated>
            <id>https://lebkowski.name/api-tokens</id>
            <summary>Improving a system from just accepting a static secret value to really secure API token mechanisms can be hard</summary>            <content type="html"><![CDATA[<p class="post-body__p">I am building a programmatic access to my website. Or maybe that’s just a fancy way of saying that I’m designing an API. Either way, one of the core elements of the project is the authentication method. I need a way of knowing who is the sender of any given message (API request).</p>

<p class="post-body__p">Since this is more of an experiment rather than a serious feature in a mature project, some corner-cutting was in order. In the initial draft, I just derived a single, static token based on the user ID. This would look something like this pseudocode (of course the secret would be generated once and stored):</p>

<pre class="post-body__pre"><code class="post-body__code">secret := random_bytes 32
hash := hash_hmac secret id
token := join "_" id hash
</code></pre>

<p class="post-body__p">Which then can be used in the following way:</p>

<pre class="post-body__pre"><code class="post-body__code">id, hash := split "_" token
verify = hash_hmac secret id
match verify == hash:
  true → id
  false → null
</code></pre>

<p class="post-body__p">The primary upside of that solution was that it worked, and it took about 5 minutes to implement. The obvious downside: it was only slightly more secure than attaching a „bro, trust me” to the payload.</p>

<h2 id="the-characteristics-of-a-static-api-token" class="post-body__h2 post-body__heading">The characteristics of a static API token</h2>

<p class="post-body__p">So, a lot of the web apps do this actually. Or at list a similar implementation, but for all intents and purposes, the results are the same. You navigate to the settings page, where you can find a single token you can use for authorization.</p>

<p class="post-body__p">Let’s examine its characteristics, and I’ll try to be generous:</p>

<ul class="post-body__ul">
<li class="post-body__li">✅ It does not try to roll out a fancy pseud-crypto algorithm to derive the value, it just calculates a message digest. That in itself allows us to avoid some common pitfalls, like a padding attack for example. And although, in all fairness, I don’t believe that using a padding attack would be feasible in this scenario, using some strong foundations is a good start</li>
</ul>

<p class="post-body__p">I think that is the only positive of this solution. I won’t even count implementation time, since I can’t imagine a world in which a few hours spared while implementing would outweigh the risks that it brings:</p>

<ul class="post-body__ul">
<li class="post-body__li">⛔ There is no way of revoking a token. Once it’s compromised, it’s game over. And I don’t even mean that <em class="post-body__em">the customer does not have that option in the UI</em>. Even I, as the system author, cannot do anything about that.</li>
<li class="post-body__li">⛔ In a similar vein, there is no expiration attached to a token. This means that once someone saves it somewhere, it has the potential to be valid 10 years from now, assuming the site is up and we didn’t migrate away from this authorization method.</li>
</ul>

<p class="post-body__p">I think that with little effort I can do significantly better.</p>

<h2 id="opaque-tokens" class="post-body__h2 post-body__heading">Opaque tokens</h2>

<p class="post-body__p">My first improvement would be replacing a single static token with a random, opaque secret stored in the database. Now, a user needs to request a new token, and the backend gladly generates one for them (and stores it in the database for later use).</p>

<p class="post-body__p">When attached to an API request, the backend would lookup the token in the database, verify that it exists and is valid, and use the stored <code class="post-body__code">userId</code> value.</p>

<p class="post-body__p">How does this fix the issues I mentioned a couple of paragraphs prior?</p>

<ul class="post-body__ul">
<li class="post-body__li">✅ Now the customer can simply have a section in their panel to manage the list of tokens. Each of them can simply be revoked at their request, and its database record removed. If a token gets compromised, it can get revoked (individually) and that random string or characters would lose any of its meaning.</li>
<li class="post-body__li">✅ Each token gets an expiration date. This might be 2 weeks, 3 months or a year, depending on your situation, but at least there is one, which means that by default, these tokens will not be valid indefinitely.</li>
</ul>

<p class="post-body__p">Great, what other upsides did we get out of the box?</p>

<ul class="post-body__ul">
<li class="post-body__li">✅ There can be multiple tokens at once. The customer can name them, give them different expiration dates, and possibly — even if that’s not the case for my app right now — attach specific permissions to each of them.</li>
<li class="post-body__li">✅ Each token will have a date of last request attached, so the user can determine if the token is in use or not</li>
</ul>

<p class="post-body__p">This is already <em class="post-body__em">much better</em>, and the effort to implement a simple system like that isn’t large. So far it seems like it pays off, but there is one glaring flaw.</p>

<h2 id="storing-raw-tokens" class="post-body__h2 post-body__heading">Storing raw tokens</h2>

<p class="post-body__p">While storing raw passwords in a database wouldn’t even cross my mind, when I first implemented the above mechanism, the fact that the raw token secrets were just sitting there didn’t make me flinch.</p>

<p class="post-body__p">I must admit, that storing raw passwords has some key differences:</p>

<ul class="post-body__ul">
<li class="post-body__li">Users <em class="post-body__em">remember</em> their passwords, so changing them is a chore. On the other hand, people <em class="post-body__em">store</em> the API tokens, so if we were to invalidate one, changing it would be a one-time activity without a lasting impact</li>
<li class="post-body__li">Users <em class="post-body__em">reuse</em> passwords, so a potential breach could impact much more than just our system</li>
<li class="post-body__li">And finally, API tokens would probably authorize you to access just a subset of areas in comparison to the account password, which would most likely grant access to every app’s feature</li>
</ul>

<p class="post-body__p">Either way, exposing raw API tokens in a breach would mean service disruption for your customers, as they would need to be revoked immediately. And depending on the circumstance, some of the tokens might have been already used, causing a wider breach. The optics of the situation is also not good: a leak might happen, but a good system architecture would put more safeguards in place, so the impact is minimised.</p>

<h2 id="hashing-token-secrets" class="post-body__h2 post-body__heading">Hashing token secrets</h2>

<p class="post-body__p">We could apply rules similar to storing passwords: just hash the value, and when a request comes in, hash that too and compare the hashes. There are some key differences that complicate things:</p>

<ul class="post-body__ul">
<li class="post-body__li">Passwords are usually attached to an account identifier (like a username or an email), which allows us to look up the correct hash to run <code class="post-body__code">password_verify input hash</code> on. Tokens, on the other hand, lack that and are mostly meant to work on their own. And since secure password hashing algorithms such as Argon2 generate salt in their output, we cannot simply hash the input and look it up, since each invocation of the hash function produces different outputs.</li>
<li class="post-body__li">The app wouldn’t know the secret value. You probably know all this prompts: copy the secret now, as this is the last time the app can show it to you. This is a key principle of this security architecture, and at the same time a huge UX downside.</li>
</ul>

<p class="post-body__p">Let’s pause to think before we make our next step</p>

<h2 id="gathering-requirements" class="post-body__h2 post-body__heading">Gathering requirements</h2>

<p class="post-body__p">Next steps wouldn’t be as simple as our first improvement. Basically now the paths split, and whichever one we take, there would be a compromise that we need to make. To help us with the decision, let’s decide on the requirements we have for our system.</p>

<p class="post-body__p">In my case, that would be:</p>

<ul class="post-body__ul">
<li class="post-body__li">Since the system is not processing any sensitive data, I can sacrifice some of the security guarantees for user convenience</li>
<li class="post-body__li">I would like to be able to present a token secret to the user at any point. If that’s not obvious, I would like to do that without regenerating its value (and invalidating the previously used one in the process)</li>
<li class="post-body__li">At the same time, I want to avoid exposing raw values in case of a database leak</li>
</ul>

<p class="post-body__p">This means that my next step will not be to hash the tokens. At the same time I need to point out that it applies specifically to my current use case, and shouldn’t be treated as a silver bullet for any situation.</p>

<h2 id="adding-a-runtime-secret" class="post-body__h2 post-body__heading">Adding a runtime secret</h2>

<p class="post-body__p">Going forward, the security guarantees of our tokens will be based on the fact that there are two distinct sources of secrets in our app:</p>

<ul class="post-body__ul">
<li class="post-body__li">Each token’s random secret value</li>
<li class="post-body__li">And some kind of global application secret</li>
</ul>

<p class="post-body__p">That application secret could be different per user or account, but the most important part is that it wouldn’t be stored in the same place as the tokens, so they would never leak if the database gets compromised. Ideally, it would only come from a secrets vault during the app’s runtime.</p>

<p class="post-body__p">The easiest way would be just to use the app secret as a symetric key and store the tokens in an encrypted form.</p>

<ul class="post-body__ul">
<li class="post-body__li">Gaining access to the token database wouldn’t bring the attacked any immediate gains, as the token secrets would be encrypted.</li>
<li class="post-body__li">Similarly just having the encryption key is of no use unless you get a leaked token</li>
</ul>

<p class="post-body__p">Having a database breach would still mean that the tokens are tainted and require rotation, but they wouldn’t be immediately usable by an attacker, and if the key is strong enough, it wouldn’t even be worth decrypting them using brute force.</p>

<p class="post-body__p">On the other hand, leaking the app secret would give us time to re-encrypt using a new key, without any service disruption.</p>

<h2 id="summary" class="post-body__h2 post-body__heading">Summary</h2>

<p class="post-body__p">Architecting a security model of your app is always a game of multiple conflicting requirements. In the end it’s always a matter of which sacrifices are you willing to make, what risks are you accepting to have, and how your system holds as a whole, instead of just its individual parts.</p>

<p class="post-body__p">While I might know a thing or two, I am not a security professional. I might be the best person to secure the API of my product, and the end product could be good enough to be accepted at my company, but it’s obvious that your requirements and risk tolerance are likely completely different. So while I hope sharing my thoughts might be useful to some, always stay frosty when listening to security advice from strangers on the internet.</p>
]]></content>
        </entry>
            <entry>
            <title type="html"><![CDATA[Turtle: the unit testing showcase]]></title>
            <link href="https://lebkowski.name/turtle/"/>
            <updated>2024-12-04T00:00:00+00:00</updated>
            <id>https://lebkowski.name/turtle</id>
            <summary>A demo project showcasing test suite organization,
arrange/act/assert pattern, how to create and use test doubles,
gherkin syntax for unit tests, and more
</summary>            <content type="html"><![CDATA[<p class="post-body__p">Some time ago I created a demo project to showcase my approach to <a href="/automated-testing" class="post-body__a">automated testing</a>, with a particular focus on the arrange/act/assert and gherkin syntax. Let me dive into it and explain some patterns behind it.</p>

<p class="post-body__p">Here are the links to the projects implemented in different languages:</p>

<ul class="post-body__ul">
<li class="post-body__li"><a href="https://github.com/mlebkowski/turtle" class="post-body__a">PHP</a></li>
<li class="post-body__li"><a href="https://github.com/mlebkowski/sharp-turtle" class="post-body__a">C Sharp</a></li>
<li class="post-body__li"><a href="https://github.com/mlebkowski/a-type-of-turtle" class="post-body__a">TypeScript</a></li>
</ul>

<h2 id="the-test-placement" class="post-body__h2 post-body__heading">The test placement</h2>

<p class="post-body__p">Various languages, and even frameworks have different conventions when it comes to structuring your test sources. Regardless of that, we’d like them to share a common attribute:</p>

<p class="post-body__p">The tests and production sources should be explicitly separated. This helps with a plethora of things:</p>

<ul class="post-body__ul">
<li class="post-body__li">It’s easier to IDE to distinguish between production and test sources</li>
<li class="post-body__li">You can easily exclude the test sources from builds &amp; releases</li>
<li class="post-body__li">You can create rules that would prevent production code from depending on test sources (with tools like <a href="https://github.com/sverweij/dependency-cruiser" class="post-body__a">dependency cruiser</a> or <a href="https://qossmic.github.io/deptrac/" class="post-body__a">deptrac</a>)</li>
<li class="post-body__li">There is a natural place to put your test doubles</li>
</ul>

<p class="post-body__p">In practice, I proposed the following patterns:</p>

<ul class="post-body__ul">
<li class="post-body__li">For PHP, a separate <code class="post-body__code">tests</code> folder was placed next to <code class="post-body__code">src</code>, and an <code class="post-body__code">autoload-dev</code> composer rule was added. The PSR-4 root is the same for both (think: <code class="post-body__code">Acme\Project\</code>), so the test and the test doubles live in the same namespace as the system under test (but different path). This is also convenient, as the IDE will automatically suggest the correct path to place the test when generating it; same when implementing interfaces as test doubles.</li>
<li class="post-body__li">TypeScript and JavaScript use <code class="post-body__code">__tests__</code> subdirectory relative to the system under test</li>
</ul>

<h2 id="test-doubles" class="post-body__h2 post-body__heading">Test doubles</h2>

<p class="post-body__p">Once you start treating your test sources as first-class citizens, some of the common patterns start to feel deprecated. For example, creating your test doubles using metaprogramming might be quick and convenient, but you wouldn’t do the same for your production sources. This is part of the reasoning behind explicitly implementing test doubles.</p>

<p class="post-body__p">This means, that instead of dynamically creating a mocked implementation, a separate class implementing a given interface is created. So you’d have your <code class="post-body__code">InMemoryFooRepository</code> with a trivial implementation (some go as far as testing the test doubles themselves if they become too complicated).</p>

<ul class="post-body__ul">
<li class="post-body__li">Having an explicit test double adds semantics to your code. You can immediately recognize the purpose and behaviour of a double</li>
<li class="post-body__li">It helps with readabilty, by hiding away the often verbose setup of a mock from the test case into a separate class</li>
<li class="post-body__li">It promotes reuse, improves static analysis and allows the test doubles to be included in any refactoring</li>
</ul>

<p class="post-body__p">There is nothing wrong with using a mocking library itself. If your dependency does not play a crucial role in your test case, you might as well mock it dynamically for convenience.</p>

<p class="post-body__p">Examples of test doubles:</p>

<ul class="post-body__ul">
<li class="post-body__li"><a href="https://github.com/mlebkowski/turtle/blob/main/tests/TurtleSpy.php" class="post-body__a">A Spy in PHP</a></li>
<li class="post-body__li"><a href="https://github.com/mlebkowski/a-type-of-turtle/blob/main/src/Canvas/__tests__/CanvasSpy.ts" class="post-body__a">A Spy in TypeScript</a> is trully trivial in its implementation</li>
</ul>

<h2 id="test-cases-readability" class="post-body__h2 post-body__heading">Test cases readability</h2>

<p class="post-body__p">Some testing frameworks are better than others in this regard, because they allow to use more natural language to describe the test cases. <a href="https://jestjs.io/" class="post-body__a">Jest</a> does a fine job, similarly a PHPunit addon called <a href="https://pestphp.com/" class="post-body__a">Pest</a>. But even if the test cases are described using sentences, it does not help with the scenario body.</p>

<p class="post-body__p">This is why in my tests, each test case is accompanied by a scenario file, which is basically responsible for abstracting away implementation details:</p>

<ul class="post-body__ul">
<li class="post-body__li">You have to prepare some existing state (dependencies) and inputs for the test to run. You can do this imperatively in the test source, or move to a scenario and call <code class="post-body__code">givenThisAndThatExists(...)</code> method. There is no magic, just moving a bunch of stuff to a method.</li>
<li class="post-body__li">Then, you usually construct your system under test. This might get <a href="https://lebkowski.name/unit-test-code-style/#creating-system-under-test" class="post-body__a">unexpectedly complex</a>. This should also be extracted to a scenario method like <code class="post-body__code">whenSomethingHappens()</code></li>
<li class="post-body__li">Finally, we have our assertions phase, which are similarly implemented using <code class="post-body__code">thenFoo()</code> or <code class="post-body__code">andBar()</code> methods.</li>
</ul>

<p class="post-body__p">The test scenario keeps the state, and exposes a mini domain specific language to the test case. It’s not meant to be reused between different test cases, so we can focus on making it as specific as we can. It will use other common patterns, described in the next chapter, which will help with reusability.</p>

<p class="post-body__p">Extracting the scenario also helps with keeping the arrange/act/assert pattern for your test case. In the end, your test cases look like this, and there isn’t ever a reason for them to become any more complex than that (<a href="https://github.com/mlebkowski/a-type-of-turtle/blob/main/src/Bound/__tests__/BoundTurtle.spec.ts" class="post-body__a">source</a>):</p>

<pre class="post-body__pre"><code class="post-body__code">it("moves within the bounding box", () =&gt; {
  boundTurtleScenario()
    .givenBoundingBox(boundingBox)
    .whenTurtleMoves(30)
    .thenThePositionIs(new Point(30, 0));
});

it("moves cannot move outside the box", () =&gt; {
  boundTurtleScenario()
    .givenBoundingBox(boundingBox)
    .whenTurtleMoves(100)
    .thenOutOfBoundsExceptionIsExpected(
      "Moved to 100×0 outside of Rectangle&lt;-50×-50, 50×50&gt;",
    );
});
</code></pre>

<h2 id="builders-and-mothers" class="post-body__h2 post-body__heading">Builders and Mothers</h2>

<p class="post-body__p">You can improve the readability even further by implementing some design patterns aimed to help creating your objects.</p>

<ul class="post-body__ul">
<li class="post-body__li">Add a regular builder to create complex objects. It might not be used in production, or there even might be a production builder for a given object with a different interface. That doesn’t matter, you can still build one for your tests.</li>
<li class="post-body__li">An object Mother is basically a factory that produces just <em class="post-body__em">any</em> representation of a given object, usually an entity or a value object. If you need to be more specific, your mothers can have many static factory methods.</li>
<li class="post-body__li">Somewhere there’s a line between using a Mother and a Builder (and the Mother itself might be implemented using the Builder, why not?). Do what’s more convenient to you.</li>
</ul>

<h2 id="custom-assertions" class="post-body__h2 post-body__heading">Custom assertions</h2>

<p class="post-body__p">The same principle applies to complicated assertions. Sometimes you’d like to check more than just one scalar matching another one. In these cases, just create a custom assertion classes which take inputs and execute multiple smaller assertions and checks.</p>

<p class="post-body__p">Example: <a href="https://github.com/mlebkowski/a-type-of-turtle/blob/main/src/Bound/BoundingBoxAssertion.ts" class="post-body__a">BoundingBoxAssertion.ts</a></p>

<h2 id="using-spies-and-testing-exceptions" class="post-body__h2 post-body__heading">Using spies and testing exceptions</h2>

<p class="post-body__p">In many of the testing frameworks, the <a href="/automated-testing/#deciding-what-assertions-to-make" class="post-body__a">three different outputs</a> (and throwing exceptions) is handled in different ways:</p>

<ul class="post-body__ul">
<li class="post-body__li">The results are checked using an assertion library such as <code class="post-body__code">expect()</code> or <code class="post-body__code">assertThat()</code></li>
<li class="post-body__li">Expectations about outgoing messages sent (called methods) need to be set beforehand on the mocked dependencies (<code class="post-body__code">$mock-&gt;expect()</code>)</li>
<li class="post-body__li">And handling throwing test cases is done differently altogether, by adding an <code class="post-body__code">@expectedException</code> annotation/attribute or wrapping the SUT in a lambda and using a <code class="post-body__code">toThrow()</code> expectation</li>
</ul>

<p class="post-body__p">There is no reason for all this. When using a scenario file and test doubles:</p>

<ul class="post-body__ul">
<li class="post-body__li">After you execute the method under test, both the result and any exceptions thrown are saved (see: <a href="https://github.com/mlebkowski/turtle/blob/main/tests/BoundTurtle/BoundTurtleScenario.php#L33-L42" class="post-body__a"><code class="post-body__code">whenTurtleMoves()</code></a>)</li>
<li class="post-body__li">All the Spy test doubles store their incoming messages (invoked methods and their arguments) for later inspection</li>
</ul>

<p class="post-body__p">This allows us to simply use the assertion library on different fields, for example:</p>

<ul class="post-body__ul">
<li class="post-body__li"><code class="post-body__code">expect(this.result).toBe(…)</code></li>
<li class="post-body__li"><code class="post-body__code">assertInstanceOf($this-&gt;exception, RuntimeException::class)</code></li>
<li class="post-body__li"><code class="post-body__code">expect(this.spy.calls.save).toHaveLength(1)</code></li>
</ul>

<p class="post-body__p">They are all abstracted away in a scenario behind a <code class="post-body__code">thenSomething()</code> method.</p>

<h2 id="closing-thoughts-and-next-steps" class="post-body__h2 post-body__heading">Closing thoughts and next steps</h2>

<p class="post-body__p">This is the approach I use 90% of the time, which helps me remove friction from writing unit tests. It sure causes a lot of files/classes to be created, but rarely any of these sources are complex, so they are easy to make. What do you think about this approach? Do you like it? Do you use some of these patterns?</p>

<p class="post-body__p">Read more of my <a href="/testing" class="post-body__a">articles about testing</a> or consider <a href="/offer/consulting" class="post-body__a">hiring</a> me for consultation on your project.</p>
]]></content>
        </entry>
            <entry>
            <title type="html"><![CDATA[Automated testing]]></title>
            <link href="https://lebkowski.name/automated-testing/"/>
            <updated>2024-12-04T00:00:00+00:00</updated>
            <id>https://lebkowski.name/automated-testing</id>
            <summary>After you follow a few simple rules, automated testing poses no challenges. Here are some principles I follow to make my life easier.</summary>            <content type="html"><![CDATA[<p class="post-body__p">There is a group of software engineers (and full disclosure: not so long ago I was part of that group) that when asked about the test coverage of their software product, they answer along the lines:</p>

<blockquote class="post-body__blockquote">
  <p class="post-body__p">Yeah, we have some here and there, but we’re not in it for the numbers. If we encounter some particularly complex piece of code then we test it, but otherwise it’s at the author’s discretion to decide</p>
</blockquote>

<p class="post-body__p">They are not denying the benefits of automated testing, but at the same time, by their own admission, they limit their usefulness only to particular cases. <em class="post-body__em">From my experience</em>, this is usually due to friction that appears while writing them: the team probably lacks experience to create the tests or to build the architecture supporting them, the application design poorly supports developing clean test cases, etc.</p>

<p class="post-body__p">After you learn a few tricks to overcome aforementioned obstacles, the process of building your automated test suite becomes a joy, and you can swiftly improve your 10-20% coverage into a 70-90% coverage, increasing your benefits by an order of magnitude. So if a team already recognizes the value of automated testing, with fairly little effort you can turn it from one that only occassionally writes test, to one that does that by default. And this article is meant to show you some of those tricks.</p>

<h2 id="the-purpose-of-the-tests" class="post-body__h2 post-body__heading">The purpose of the tests</h2>

<p class="post-body__p">In my opinion, there are primary and secondary purposes for having an automated test suite, but if I had to pick one, that’d be:</p>

<blockquote class="post-body__blockquote">
  <p class="post-body__p">An automated test suite is there to give you confidence in some assumptions about how your code behaves in a given scenario and environment</p>
</blockquote>

<p class="post-body__p">I believe the only thing a suite can give you guarantees about is that probably something is broken when the tests fail, but not the other way around: a green result doesn’t necessarily mean that everything is working smoothly.</p>

<p class="post-body__p">At the same time, the larger your suite is, the more well-crafted are your scenarios, and the better you <em class="post-body__em">understand</em> what your tests cover, the more closely this confidence resembles guarantees. And for a lot of practical purposes, there are situations in which my trust in the automated tests is so high, that them successfully passing is sufficient for me to push a change to production.</p>

<h2 id="isolating-the-thing-we-want-to-test" class="post-body__h2 post-body__heading">Isolating the thing we want to test</h2>

<p class="post-body__p">In every automated test, there is a system under test (SUT). It’s easiest to illustrate this in the case of a unit test, where many times the SUT will just be a single class with some behaviour we’d like to get guarantees about. But neither in unit tests, nor in higher level tests should we equate SUT with a class, but rather with a black-box, a part of the system (either very small or a very big one) with clear boundaries. In each test, we’d like to act from outside of these boundaries, observe the results and side effects outside of the box, and ignore whatever is happening inside the box.</p>

<p class="post-body__p">Here is how it looks like:</p>

<p class="post-body__p"><img src="https://lebkowski.name/assets/images/automated-testing/sut.png?61294d" alt="" class="post-body__img"></p>

<p class="post-body__p">We can also see from this diagram, that every test scenario starts with an incoming message. For low-level (unit) tests that will probably be a method call, while for higher level tests that would be simulating a HTTP request or dispatching a command on the command bus.</p>

<p class="post-body__p">What’s important here: we need to isolate the SUT at the appropriate abstraction level. This means:</p>

<ul class="post-body__ul">
<li class="post-body__li">When testing a single unit, like a class or a small collection of classes, we don’t want them to depend on the whole application, backing storage or environment. This means, for example, that we don’t want the class to depend on the <a href="https://stitcher.io/blog/service-locator-anti-pattern" class="post-body__a">Service Locator</a> (or Dependency Injection Container), nor any global state. We want to explicitly pass any dependency, because <strong class="post-body__strong">we need to control the environment outside the box</strong>.</li>
<li class="post-body__li">This is very similar to application level testing, only the box is larger. How large and what shape is up to you: do you want to include the persistent storage or not? Caches? Live external APIs or mocks? Filesystem?</li>
</ul>

<h2 id="unit-vs-integration-vs-functional" class="post-body__h2 post-body__heading">Unit vs integration vs functional</h2>

<p class="post-body__p">Depending on the size and shape of the box you choose, you will get different guarantees from your test suite. The smaller it is, the more detailed the test scenarios can be, and easier it is to test any edge cases. But at the same time, the farther from your real production environment you get, because a large portion of your app is replaced by test doubles or a staged environment, that may have nothing in common with your real-world use cases.</p>

<p class="post-body__p">Larger surface area, on the other hand, tests more of your application’s component together, usually with a real backing storage (like a SQL database), but will be slower and harder to iron out those gritty details.</p>

<p class="post-body__p">This is where the concept of classic pyramid of testing comes from: a lot of unit tests at the bottom, and fewer higher level test as we go up the layers. This is also something I personally usually implement in my projects: push as much logic from outer layers into inner ones (think: from controllers to services, or from the application layer to the domain layer, from imperative shell, to the functional core, etc), add a lot of unit tests, and then just a few functional tests to see if the components are correctly glued together.</p>

<p class="post-body__p"><img src="https://lebkowski.name/assets/images/automated-testing/pyramid.png?c76f91" alt="" class="post-body__img"></p>

<p class="post-body__p">I find arguing over naming and rules counterprodictive. I don’t really know what an <em class="post-body__em">integration test</em> means to any another person, but as long as we can agree on the purpose and characteristics of any given suite, we can create them and use them to our advantage. Similarly, once I was on a team that had lenghty discussions about whether a unit test should mock every immediate dependency of a class, or if it was allowed to use concrete implementations in some cases. That discussion was secondary to the fact that the team simply stalled and didn’t write any unit tests (or a minimal amount).</p>

<p class="post-body__p">My advice is simple: desigg your own test suites, name them so that your team understands them, and then choose for yourself if they will form a pyramid, an hourglass or an inverted pyramid, all depending on what results you think will be beneficial for your business.</p>

<h2 id="deciding-what-assertions-to-make" class="post-body__h2 post-body__heading">Deciding what assertions to make</h2>

<p class="post-body__p">Getting back to the system under test diagram:</p>

<p class="post-body__p"><img src="https://lebkowski.name/assets/images/automated-testing/sut.png?61294d" alt="" class="post-body__img"></p>

<p class="post-body__p">The test starts with an incoming message, and every process has its input and an output. For automated software testing, we can differentiate three kinds of outputs, and each SUT will have between one and all of them:</p>

<ul class="post-body__ul">
<li class="post-body__li"><strong class="post-body__strong">The return value</strong>: whatever you get back from your method call or the HTTP response you get from your HTTP request.</li>
<li class="post-body__li"><strong class="post-body__strong">Side effects</strong>: outgoing messages to any explicit or implicit dependencies. To put it in simpler terms, those any method calls to other services/classes/apis with intent to modify state. Some examples include writing to cache or a database, changing a value of a global variable, saving a file to disk, executing a POST API call, sending an email, etc.</li>
<li class="post-body__li"><strong class="post-body__strong">Changed SUT’s internal state</strong>: and on some occasions, the side-effects are observable on the SUT itself, for example when executing a mutation on an entity. But keep in mind that we’re only talking about <em class="post-body__em">publicly visible state</em>, so unless it has a getter (simply speaking), we don’t care about changes to the private state of SUT, because that is inside of the black box and covered by the fog of war.</li>
</ul>

<p class="post-body__p">In addition, each incoming message that starts the process can have one of two characteristics (or on rare occassions, both):</p>

<ul class="post-body__ul">
<li class="post-body__li"><strong class="post-body__strong">Query</strong>: when we generally don’t expect any side-effects, and only care about the return value</li>
<li class="post-body__li"><strong class="post-body__strong">Commands</strong>: are the opposite, usually not returning a value or a one we don’t want to make any assertions about, but their main purpose is to <em class="post-body__em">create some side-effects</em>.</li>
</ul>

<p class="post-body__p">Here is a matrix on how we’d like to make assertions for each kind of message and output (credits for the idea: <a href="https://www.youtube.com/watch?v=URSWYvyc42M" class="post-body__a">Sandi Metz</a>):</p>

<p class="post-body__p"><img src="https://lebkowski.name/assets/images/automated-testing/matrix.png?d9e808" alt="" class="post-body__img"></p>

<p class="post-body__p">In short:</p>

<ul class="post-body__ul">
<li class="post-body__li">When executing a <em class="post-body__em">query</em>, we only make assertions about the response value and ignore all the rest</li>
<li class="post-body__li">When executing a <em class="post-body__em">command</em>, we make sure the SUT makes outgoing calls or changes it’s internal state that we can observe, and ignore all the rest</li>
</ul>

<p class="post-body__p">This means we can explicitly ignore all of the calls to self (for example, calling private methods or setting private state), which are happening <em class="post-body__em">inside of the black-box</em>. In a test scenario, we don’t care about that, these are implementation details. If we break this rule, we will end with a test suite that is more fragile, and it will break more often when refactoring — when the behaviour does not change. That’s friction we’d like to avoid.</p>

<p class="post-body__p">On a higher level, say in application testing:</p>

<ul class="post-body__ul">
<li class="post-body__li">We don’t care if a particular service was called.</li>
<li class="post-body__li">We might want to test if an email was sent, as in our definition, that probably reaches outside of our app.</li>
<li class="post-body__li">We shouldn’t make assertions about what is saved to the database, because it’s considered private state. Instead, we’d want to use a public endpoint to query for that data. Think of it this way: your customers don’t care if the record they created is saved in the database. What they do care about is whether it’s returned on a list of records, or more importantly, if it’s then used in the business processes.</li>
</ul>

<p class="post-body__p">This is a powerful concept:</p>

<blockquote class="post-body__blockquote">
  <p class="post-body__p">The output of the process of creating a reminder is not a record in the database. It is the fact of an alarm going off at the time specified in the input.</p>
</blockquote>

<h2 id="crafting-the-black-box" class="post-body__h2 post-body__heading">Crafting the black-box</h2>

<p class="post-body__p">To help with controlling the environment outside of the box, we need to make sure SUT relinquishes control over it. This is commonly known as <a href="https://stackoverflow.com/questions/3058/what-is-inversion-of-control" class="post-body__a">The Inversion of Control principle</a>. In practice, for our automated test suite, this means that instead for SUT to know it’s dependencies and state, we need to make them explicit and pass them in.</p>

<p class="post-body__p">Examples of dependencies and state:</p>

<ul class="post-body__ul">
<li class="post-body__li">Dependency injection of regular class dependencies: instead of creating a mailer inside of the class, we expect an object implementing a specific interface to be passed in either via the constructor, on as the part of the incoming message (e.g. a method argument)</li>
<li class="post-body__li">Same for querying system state — instead of using global state (singletons, static methods, global variables), we pass the state in: either as a method argument, or using dependency injection in conjunction with the repository pattern.</li>
<li class="post-body__li">An often overlooked part of the global state is time. Some of our behaviour <em class="post-body__em">will yield different result based on what time it is</em>. A <a href="https://www.php-fig.org/psr/psr-20/" class="post-body__a"><code class="post-body__code">ClockInterface</code></a> is meant to provide the system time, but since it’s an abstraction, it allows us to provide a test double which will behave exactly the way we want in a given test scenario, making the tests independent of system time itself.</li>
</ul>

<p class="post-body__p">In more broad terms, the idea of <a href="https://www.wikiwand.com/en/articles/Hexagonal_architecture_(software)" class="post-body__a">ports and adapters from hexagonal architecture</a> can be used. Ports are holes in our SUT that we want to fill in with different shaped pegs (adapters). These adapters are either real-world implementations (<code class="post-body__code">DatabaseEntityRepository</code>, <code class="post-body__code">SystemClock</code>) or test doubles (<code class="post-body__code">InMemoryEntityRepository</code>, <code class="post-body__code">FrozenClock</code>). Ports live on the edge of our black-box, and allows us to connect it with our pre-defined environment.</p>

<p class="post-body__p"><img src="https://lebkowski.name/assets/images/automated-testing/adapters.png?f19b7e" alt="" class="post-body__img"></p>

<h2 id="what-s-next" class="post-body__h2 post-body__heading">What’s next?</h2>

<ul class="post-body__ul">
<li class="post-body__li">Read more articles in the <a href="/testing" class="post-body__a">automated testing</a> category</li>
<li class="post-body__li">A <a href="/turtle" class="post-body__a">demo project</a> showcasing test suite organization, arrange/act/assert pattern, 
how to create and use test doubles, gherkin syntax for unit tests, and more</li>
<li class="post-body__li">Does the article make sense? <a href="/offer/consulting" class="post-body__a">Hire me</a> to help you with your test suite</li>
<li class="post-body__li">👇 Or book a call, so we can talk about how I can help your team</li>
</ul>
]]></content>
        </entry>
            <entry>
            <title type="html"><![CDATA[The rise and fall of Evernote]]></title>
            <link href="https://lebkowski.name/evernote/"/>
            <updated>2024-01-04T00:00:00+00:00</updated>
            <id>https://lebkowski.name/evernote</id>
                        <content type="html"><![CDATA[<p class="post-body__p">The moment when <a href="https://killedbygoogle.com/" class="post-body__a">Google killed Reader</a> is fresh in my memory. It was at that time I realized it cannot be trusted. Except for my email. And payments. And documents. And calendar. And maps. And YouTube. And home entertainment (chromecast). Or as my default browser. But barring all this, I never trusted Google again, and I even changed my default search engine to <a href="https://duckduckgo.com/" class="post-body__a">DDG</a> for a week</p>

<p class="post-body__p">But that was not its first strike. A few years earlier, after a long process of enshittification, Google announcing it wil be closing <a href="https://www.wikiwand.com/en/Google_Notebook" class="post-body__a">Notebook</a> — its all-purpose note taking, stuff-saving, research helper application. This was the final straw for me, and since then I switched completely to <a href="https://evernote.com/" class="post-body__a">Evernote</a> (which I was a member since 2009).</p>

<p class="post-body__p">Evernote was great. A little buggy at first, it had its problems, but for the most part it was a featur rich application. I used it mostly for:</p>

<ul class="post-body__ul">
<li class="post-body__li">The web clipper: with one keyboard shortcut, I had the option to save any webpage, either in its rich form, just a text selection, or simplified view (think: reader view, plain text). I’ve saved <em class="post-body__em">tons</em> of pages, and unlike a bookmark manager, I don’t have to worry that those site’s will go down at one point, since I have the content backed up, not just the links.</li>
<li class="post-body__li">The notes could be well organized and searched: using a tree of notebooks to hold them, and tags to help. In addition, it was able to index PDFs and as far as I remember OCR the images</li>
<li class="post-body__li"><a href="https://www.wikiwand.com/en/Evernote#Skitch" class="post-body__a">Skitch</a>, a great screenshot with annotations tool. It was a standalone product, but Evernote fairly early acquired it and integrated it into its ecosystem (the screenshots were automatically saved to evernote)</li>
<li class="post-body__li">Creating notes by email</li>
<li class="post-body__li">Sharing notebooks with other people to collaborate on various projects</li>
</ul>

<p class="post-body__p">I was very satisfied with it, and it was one of the earliest subscriptions I was paying for <strong class="post-body__strong">proudly</strong> for many years. Until things turned for the worse in recent years. I canceled my subscription last year, because I found myself using evernote less and less. It was still a great value, but none of the premium features were useful to me. I still used the clipper, shared some notebooks with my wife, had tons of recipes and other notes I would browse on a weekly basis. But none of the premium features were appealing to me any more.</p>

<p class="post-body__p">I also stopped using Skitch, since <a href="https://isapplesiliconready.com/app/Skitch" class="post-body__a">it was not running natively on the silicon macs</a>. I switched to <a href="https://cleanshot.com/" class="post-body__a">CleanShot X</a> with a subscription from <a href="https://setapp.com/" class="post-body__a">Setapp</a>. It’s actually much more feature-rich, which is rather expected — Skitch aimed to be simple.</p>

<p class="post-body__p">So I decided to cut the cost. I had to reduce the number of devices I used the app on to two: the web client and my iPhone. That was an inconvenience (for example, I often used it on my iPad), but nothing I couldn’t handle. Things were good for a period of time, until last month, Evernote put the last nail in its coffin: their free plan was reduced to one notebook and 50 notes.</p>

<p class="post-body__p">I have over 2500 notes across dozen of notebooks.</p>

<p class="post-body__p">And I don’t even have the mac version to export the notes. How do you even?!</p>

<p class="post-body__p">After 15 years its time to move on entirely. Notion seems like the default choice: it’s where the cool kids hang these days. But interestingly, I’ve known about Notion almost since its inception, but never got to use it, and I am not really that drawn to it. <a href="https://joplinapp.org/" class="post-body__a">Joplin</a> seems like an interesting alternative — it does not lock you in, and you are the owner of your own data at all times. There is an option to use Dropbox as storage, which is a tempting solution, as I am a premium member already.</p>

<p class="post-body__p">Dropbox itself has a competing product called Paper. I used it a few years ago for a project. It was nice, but nowhere near as powerful as Evernote was. My default app for quick notes, <a href="https://bear.app/#" class="post-body__a">Bear</a>, also has a clipper, but I just don’t see how it could act as a knowledge repository. The interface is just too focused on simple notes. Or should I just make it up with Google and switch to Keep?</p>

<p class="post-body__p"><img src="https://lebkowski.name/assets/images/blog/evernote/image.png?446433" alt="" class="post-body__img"></p>
]]></content>
        </entry>
            <entry>
            <title type="html"><![CDATA[This blog’s 10th anniversary]]></title>
            <link href="https://lebkowski.name/10th-anniversary/"/>
            <updated>2024-01-03T00:00:00+00:00</updated>
            <id>https://lebkowski.name/10th-anniversary</id>
                        <content type="html"><![CDATA[<p class="post-body__p">I recently realized, that this blog is one of my longest, if not <em class="post-body__em">the longest</em> software project, that I currently maintain. While even some of my work I created in late 2000-s is still out there, my impact on them wasn’t as large, and certainly I am not contributing to any of them any more.</p>

<p class="post-body__p">So to celebrate it’s 10th year, I took a stroll down the memory lane to talk about some of the most promiment attributes of this site.</p>

<h2 id="blogging-history" class="post-body__h2 post-body__heading">Blogging history</h2>

<p class="post-body__p">While this is the longest software project, my blogging history itself is much longer, as I started in the early 2000s. While it was some time ago (almost a quarter of a century, actually), times were suprisingly similar. Blogs, or rather personal websites, as the term wasn’t really that popular yet, were either self-hosted or published using one of the existing blogging platforms. At the time, the leading software provider was <a href="https://www.movabletype.org/" class="post-body__a">Movable Type</a> (which, TIL, is still alive today), and it was yet a few years before WordPress was created.</p>

<p class="post-body__p">And as the blogosphere flourished, so did my writing. Over the years I created, hosted, and wrote literally dozens of blogs, mixing both personal and professional topics. But I always had <em class="post-body__em">this</em> site, my personal site. It evolved multiple times, as I was learning the craft of web development: 
* Starting out under a free domain, hosted on my personal computer at home, its contents consisted mostly of movie reviews and some content about me
* Then renamed to <em class="post-body__em">lebkowski.info</em> with 3 or 4 major redesigns along the way, it was mostly a blog about me, my travels &amp; adventures, web development and interacting with the blogosphere in general
* And some time between late 2013 and early 2014 it was replaced by a static one-pager <em class="post-body__em">lebkowski.name</em>, which is was a precursor for this site</p>

<h2 id="switching-from-php-engine-to-static-site" class="post-body__h2 post-body__heading">Switching from PHP engine to static site</h2>

<p class="post-body__p">I can’t remember the reasoning behind that decision, but I decided to scrap all existing content on my site and replace it with a simple static page. There was no blog or articles. And as such it was fitting to publish it as a static HTML site. I remember being <em class="post-body__em">inspired</em> by another site when creating the layout, and using some kind of fancy editor with the ability to automatically compile assets, synchronize multiple devices and hot reloading (it used an early version of browsersync or a similar solution) and automatically deploy the built website using FTP et. al.</p>

<p class="post-body__p">At the time, we were using <a href="https://lesscss.org/" class="post-body__a">Less</a> as a CSS preprocessor at Docplanner, so that was my technology of choice for personal projects as well.</p>

<p class="post-body__p">When it comes to deployment, I can’t remember how this static HTML was delivered to production (it might have been a manual process), but 2014 were the early days of docker. I was fascinated by this new way of thinking, and the possibilities it opened for PaaS solutions. And soon I adapted <a href="https://dokku.com/" class="post-body__a">Dokku</a> to build and host all my projects, thrilled by the simplicity of the build process it introduced (similarly to heroku).</p>

<p class="post-body__p">Not long after I decided to bring back articles, but I wanted the site to remain static, so I moved the engine to <a href="https://sculpin.io/" class="post-body__a">Sculpin (PHP static site generator)</a> — I wrote content in markdown, dokku built and released, digitalocean hosted. This was in mid-2014, and this same skeleton in the same git repository lives and powers the site to this day. But there sure were changes since then!</p>

<h2 id="feeds" class="post-body__h2 post-body__heading">Feeds</h2>

<p class="post-body__p">RSS, contrary to popular belief, is not dead. So this was the founding block of any of the blogs I built. This site was no exception. Moreover, <a href="https://www.w3.org/Provider/Style/URI" class="post-body__a">cool URIs don’t change</a>. This is why if someone subscribed to my site’s feed around 2005, it would work continuously to this day, nearly 20 years later.</p>

<p class="post-body__p">Do I miss out on analyzing visitor traffic by allowing consuming my content on different platforms this way? Technically, yes. But also: I removed visitor tracking altogether when Google tried to force a migration to Analytics v4, and I’ve been living happily without knowing the numers ever since.</p>

<h2 id="using-media-in-my-content" class="post-body__h2 post-body__heading">Using media in my content</h2>

<p class="post-body__p">At some point I stumbled upon an obstacle: how to embed rich content like youtube videos in my content, which is created in markdown. While markdown technically allows mixing with HTML, I did not want that and opted for a simpler option: just link to the content.</p>

<p class="post-body__p">You know, back in 2008, on the wave of Web 2.0 hype, some person named <a href="https://blog.leahculver.com/2008/05/announcing-oembed-an-open-standard-for-embedded-content.html" class="post-body__a">Leah Culver</a> proposed a standard protocol for sharing and embedding rich web content: <a href="https://www.wikiwand.com/en/OEmbed" class="post-body__a">oEmbed</a>. This allowed me to just write a paragraph with an URL, and with some <a href="https://embed.ly/" class="post-body__a">embedly</a> magic it was automatically turned into a rich embed. Based on open standards, and supporting any data provider (and with embedly’s help, even some that do not support it natively).</p>

<h2 id="search" class="post-body__h2 post-body__heading">Search</h2>

<p class="post-body__p">At one point I integrated with <a href="https://www.algolia.com/" class="post-body__a">Algolia</a> to provide a search feature. I was using it heavily for commercial pruposes, and it seemed fitting for this site as well. I pushed the index during build time, and used the JS SDK to provide the UI on the site. Unfortunately, there was little adoption from the users, so ultimately I dropped it — and haven’t thought of it since</p>

<h2 id="the-frontend-revolution" class="post-body__h2 post-body__heading">The frontend revolution</h2>

<p class="post-body__p">I mentioned opting for Less in the begining. Unfortunately, that decision did not age well, as it was ultimately <a href="https://sass-lang.com/" class="post-body__a">Saas</a> which won the preprocessor wars. I was late to the party and only got myself to switch in 2020. Along with some redesign, I introduced two major improvements:</p>

<ul class="post-body__ul">
<li class="post-body__li">I rewrote the styles to SCSS (as well as added <a href="https://browsersync.io/" class="post-body__a">browsersync</a> to the stack)</li>
<li class="post-body__li">And I made the site mobile-first. The site was responsive from the start, but it was built desktop first. It took me long enough for this change, as it was almost at the same time as people <a href="https://alistapart.com/article/mobile-first-css-is-it-time-for-a-rethink/" class="post-body__a">starting to question if we should always start with mobile</a></li>
</ul>

<p class="post-body__p">So the frontend stack was modernized about 4 years ago and it holds remarkably well to this day (I even have a component library build in case I would want to go through the redesign once more). Part of the reason is that there is almost no Javascript used, and the little there is was written in VanillaJS, so no webpack/babel is necessary.</p>

<p class="post-body__p">Speaking of javascript: as a heavy reddit user at that time (hello <a href="https://redditenhancementsuite.com/" class="post-body__a">RES</a>) I relied a lot on keyboard navigation. And I thought it would be an obscure, but otherwise an useful feature for my site as well: did you know that you can jump between content sections by pressing either <code class="post-body__code">K</code> or <code class="post-body__code">J</code> keys (not mobile friendly, I’m afraid). You can try it now.</p>

<h2 id="accelerated-mobile-pages" class="post-body__h2 post-body__heading">Accelerated mobile pages</h2>

<p class="post-body__p">Quite soon after its initial release I jumped on the AMP bandwagon. I thought it was an interesting standard. Fortunately it didn’t take me long to see it for what it really was — an attack on the open web — and removed it a few months later. It took Google about 5 years before they utimately backed down too, and stopped pushing this agenda.</p>

<p class="post-body__p">I never need AMP. It wasn’t magic. It just cut the fat from multi megabyte websites. Mine’s lean and fast without any help.</p>

<h2 id="secure-by-default" class="post-body__h2 post-body__heading">Secure by default</h2>

<p class="post-body__p">I don’t use infrastructure as a code approach here, so I can’t track exactly when it happened, but at some point I decided to switch fully to HTTPS. I think I must’ve had some paid certificates earlier, but by early 2015 I certainly switched to letsencrypt, and automated the whole ordeal. It was before Caddy or Traefik automated the whole thing, so I remember scripting it all together to work with my dokku’s nginx.</p>

<p class="post-body__p">At that time I already used <a href="https://github.com/mlebkowski/nassau-https-proxy/commit/80bde338ba585b5f2cf2070abf498e0f005b9898" class="post-body__a">SSL for local development</a>, so switching production was a no-brainer. Over time I had the ability to upgrade my ancient version of dokku so I could use <a href="https://github.com/dokku/dokku-letsencrypt" class="post-body__a">the letsencrypt plugin</a> that works out of the box. I was also able to switch from http to dns challenge, which has proven to be much more reliable in my case.</p>

<h2 id="indie-web" class="post-body__h2 post-body__heading">Indie web</h2>

<p class="post-body__p">Some of the most recent additions are the <a href="https://indieweb.org/" class="post-body__a">indie web improvements</a> I think I always followed the spirit of that movement, although not necessarily in any formal way.</p>

<p class="post-body__p">For example, in the mid 2000-s, a protocol named <a href="https://www.wikiwand.com/en/OpenID_Connect" class="post-body__a">OpenID Connect</a> was introduced and widely adopted. This allowed me to turn my site into my identity provider. Before „login with facebook” or „login with google” links, I could „sign in with your URL” and I took advantage of this. Unfortunately, the adoption withered and died, so I no longer use it. But I have it in the back of my head, and whenever a similar solution surfaces, I will be ready to switch.</p>

<p class="post-body__p">Other examples of indie web elements are for example the use of <a href="https://www.wikiwand.com/en/Semantic_Web" class="post-body__a">Semantic Web</a> in the form of JSON-LD (a successor of once popular RDF), microformats, and even such unnoticeable details as using <code class="post-body__code">&lt;time&gt;</code> element to markup dates. This makes site’s content richer for any kind of automated tools, and allows seamless integration in other places. I originally made this so that sharing links on slack or social media had a more pleasant form.</p>

<p class="post-body__p">Like webmentions. I’m on the fence with the whole liking / commenting / pinging thing. I don’t engage with the community as much these days, so the features are mostly dormant, but they are there.</p>

<h2 id="github-actions" class="post-body__h2 post-body__heading">Github actions</h2>

<p class="post-body__p">And finally, after upgrading dokku last year, and replacing my legacy digital ocean droplet with a brand new $5 one, I decided to switch the build process completely. <a href="https://dokku.com/docs/deployment/builders/herokuish-buildpacks/" class="post-body__a">The buildpack approach</a> was interesting, but caused a lot of maintenance headaches — the buildpacks became outdated or missing, and it felt I like didn’t have the process under control. I didn’t have the confidence that I would be able to recreate it easily using more modern and open toolset.</p>

<p class="post-body__p">So the first step was to switch to <a href="https://dokku.com/docs/deployment/builders/dockerfiles/" class="post-body__a">Dockerfile builds</a>. They still relied on dokku, but used dockerfiles — a standard I knew and could trust, and was not proprietary to dokku ecosystem. and from there it was just one step to extract the build process out of dokku entirely.</p>

<p class="post-body__p">Over the weekend I moved it to Github Actions. It still uses the same dockerfiles, but now it just pushes an image to the container registry and triggers dokku to rebuild. As a side effect I can now automatically deploy any branch to a staging environment, which is automatically provisioned (with SSL from LE) and decomissioned after I delete the branch.</p>

<p class="post-body__p">Most elements of this process are replaceable:</p>

<ul class="post-body__ul">
<li class="post-body__li">Can I switch sculpin to any other static site generator? It won’t be easy to maintain the existing structure but I still can — I just need to update the dockerfile build instructions afterwards</li>
<li class="post-body__li">I can replace Google Actions for any other CI server to build the artifact (docker image)</li>
<li class="post-body__li">And finally I can host that image on any platform that supports docker, which is virtually anything today</li>
</ul>

<p class="post-body__p">I feel that while the stack is understandably more complex than a couple of years ago, it is also more robust and resilent. Let’s hope for another ten years together.</p>

<h2 id="back-to-blogging" class="post-body__h2 post-body__heading">Back to blogging</h2>

<p class="post-body__p">That final push had a strong reason behind it. I wanted to return more short-form blogging. Currently, I write most of my content in a dedicated markdown editor, and then commit it to the site’s git repository (and push to release). This requires for me to be on a laptop.</p>

<p class="post-body__p">I wanted to be able to write more freely. Use <a href="https://bear.app/" class="post-body__a">my note-taking app</a> or <a href="https://github.com/prose/prose" class="post-body__a">Prose</a> on any device I choose. But since my site is still static and has no content management system, I would need to have a way of publishing notes from those places. I opted to save them to dropbox, which in turn would use a webhook to trigger the github actions build workflow — and there, a simple automation would fetch notes from storage before the sculpin would build the site.</p>

<p class="post-body__p">And this separation allows me to do just that, and it is now working and live. What remains is the hope that I find the motivation to write more often🤞</p>
]]></content>
        </entry>
            <entry>
            <title type="html"><![CDATA[Advent of code]]></title>
            <link href="https://lebkowski.name/advent-of-code/"/>
            <updated>2023-06-23T00:00:00+00:00</updated>
            <id>https://lebkowski.name/advent-of-code</id>
                        <content type="html"><![CDATA[<p class="post-body__p">I remember the time late 2015, when I was ahead of schedule on my project, and I was looking for ways to pass the time. We were spending around 7-9 hours in the office back in the day, no matter what, so being bored at work was an unpleasant experience.</p>

<p class="post-body__p">Anyway, I stumbled upon <a href="https://adventofcode.com/" class="post-body__a">Advent of Code</a>: what would soon to become a recurring event of 25 coding challenges in December. I did a bunch of those and either lost interest, or needed to get back to my actual work. But now, a couple years later, again not having anything to code on a daily basis, I went back and continued from where I left off.</p>

<h2 id="typescript" class="post-body__h2 post-body__heading">TypeScript</h2>

<p class="post-body__p">I remember doing the first couple of challenges in python as a learning experience. I think that is the most python I’ve done in my life, as far as I remember. Now, since I’m mostly transitioning to TypeScript (the last thing I’ve written in PHP was 6 months ago), I thought that would be a good choice for me.</p>

<p class="post-body__p">Unfortunately it didn’t pan out. I didn’t feel comfortable with wiring all the things around the challenges — like mostly building the module loader, and all the existing boilerplates / launchers / template generators didn’t actually fit my needs. It just wasn’t fun coding using them, and the constraint’s felt unnecessary. So after a couple of tries, I switched back to PHP.</p>

<h2 id="php" class="post-body__h2 post-body__heading">PHP</h2>

<p class="post-body__p"><a href="https://lebkowski.name/php/#what-this-means-strategically:~:text=I%E2%80%99d%20rather%20eat%20a%20chair." class="post-body__a">The chair</a> was good, thank you. Fortunately, I am not concerned about recruiting to this project, and PHP is a lot of fun for me, so here we go. After stitching together a basic loader, I went on to implement the first challenges.</p>

<p class="post-body__p">And immediately I miss TypeScript. It’s mostly the short lambdas (aka fat arrows) that make the difference. Since I was using a lot of colletion transformations, they pop up a lot, and typing the PHP’s <code class="post-body__code">static fn (…) =&gt; …</code> really makes a difference in comparison to pure <code class="post-body__code">(…) =&gt; …</code>. Prettier is a close second. It just works, and it allows me to write the code in an absolute sloppy manner, and it will fix anything, while PHP CS Fixer on the other hand, won’t even bother to insert a semicolon for me.</p>

<p class="post-body__p">Other than that, I’m having a fast pace moving forward. Whenever I’m experiencing any inconveniences, I improve the loader/boilerplate/launcher parts, and that in turn improves the DX. I extract common parts to a shared lib to reuse between solutions. And I am exploring a lot.</p>

<h2 id="example-tools-used" class="post-body__h2 post-body__heading">Example tools used</h2>

<p class="post-body__p">The loader uses the simplest form of DIC container. It scans the source directory for implementations of certain interfaces, and exposes those to certain factories. This way all I have to do is drop an entrypoint-like class anywhere, and use a marker interface on it to indicate that it should be used as a challenge solution. Similarly with input parsers — since they are always provided in a text form, the very first step of every solve is to parse it into a nice DTO.</p>

<p class="post-body__p">A lot of the solutions rely on finding the answer by brute-force. This means thousands or millions of operations. And just so I know what is going on, I created the <code class="post-body__code">Progress</code> indicator class, that iteratively displays partial results in the console, while the script is running. It also allows me to estimate the time/iterations required to find the solution, so I get a nice progress bar.</p>

<p class="post-body__p">There is a lot of combinatorics in the challenges, for example:</p>

<ul class="post-body__ul">
<li class="post-body__li">In what ways can we rearrange the set?</li>
<li class="post-body__li">How can we pick n elements out of a set of m, when the order either matters or not</li>
</ul>

<p class="post-body__p">I learned about all of this in high school, but that was decades ago, so I can’t say I remember a lot, so I am having quite a hard time to <em class="post-body__em">name</em> the concepts, so that I could build a dedicated library for it.</p>

<p class="post-body__p">I also use a lot of high level concepts, like OOP, a collection library, value objects, etc, which makes the code readable on the one hand, but painfully slow at times. Replacing a <code class="post-body__code">filter()</code> or a <code class="post-body__code">map()</code> method with a <code class="post-body__code">foreach()</code> makes a difference here.</p>

<h2 id="example-challenges" class="post-body__h2 post-body__heading">Example challenges</h2>

<h3 id="2015-day-19-medicine-for-rudolph" class="post-body__h3 post-body__heading">2015, day 19, Medicine for Rudolph</h3>

<p class="post-body__p">While most answers can be brute forced, and the hard part is to optimize the algo or find shortcuts, there are challenges which can be solved metodically.</p>

<p class="post-body__p">One such example was <a href="https://github.com/mlebkowski/advent-of-code-php/blob/main/src/Solutions/Y2015/D19/Readme.md" class="post-body__a">molecule folding</a> challenge, where <em class="post-body__em">some</em> solution could be brute forced very easily. Proving that this was the best one took me 100s of millions of iterations, and the process did not finish event then.</p>

<p class="post-body__p">Switching to a smarter approach was a lot of fun. And while I either googled or discovered a bunch of breakthroughs, that did not yield an elegant solution for me. I remember spending literally days on that one, and I learned a bunch about chemistry, parsers, and other stuff.</p>

<h3 id="2015-day-22-wizard-simulator" class="post-body__h3 post-body__heading">2015, day 22: Wizard simulator</h3>

<p class="post-body__p">This one simulates an RPG-style combat. I recall a <a href="https://ericlippert.com/2015/04/27/wizards-and-warriors-part-one/" class="post-body__a">great article about representing this kind of rules in the type system</a> (and failing), so I immediately recognized that this time, rules on who can use what weapon, and how the combat proceeds in different scenarios are <em class="post-body__em">business rules</em>, and as such are required to be represented as first class in the code.</p>

<p class="post-body__p">It is quite a different approach to what I was used to: where entities holding state are also responsible for the validity of this state and it’s mutations. Here, those responsibilities are separated, and there is a separate layer on top that ensures the business rules are followed. In my example you can see how enforcing the inventory rules of a warrior <a href="https://github.com/mlebkowski/advent-of-code-php/commit/11c37b87c226881973bf093ea8977f0b67ed1f15" class="post-body__a">was moved from that players class factory method to a separate builder</a>.</p>

<p class="post-body__p">But for the second part, where another class of characters is implemented, I also wanted to try a different approach: to use an evolutionary algorithm to solve the challenge. After implementing the magical combat rules, and <a href="https://github.com/mlebkowski/advent-of-code-php/blob/main/tests/Realms/RolePlaying/Combat/Magical/CombatTest.php" class="post-body__a">making sure they work</a>, instead of brute-forcing the solution or trying to be smart about it… I created a legion of random wizards, let them fight a clone of the final boss, and mutated the ones that did best in each iteration. And I repeated the process until my processor got hot.</p>

<p class="post-body__p">I thought it would be much easier, and much more spectacular. I was aiming to visualize the process, in which different species take over the population, because they have better results. I ended up just showing the best 5-10 ones of each iteration. And the difficult part was: how to best classify who got better result.</p>

<p class="post-body__p">My first thought was, that whomever won the combat was better to any loser, and then whomever dealt the most damage, and then who used the least resources. This yielded results quickly, but interestingly, not the <em class="post-body__em">best results</em>. The algorithm quickly arrived at local maximums and had a hard time mutating out of them. Apparently, some strategies that are good for early stage combat, arent as efficient in the later stages, and when my highly trained wizards evolved for a couple of generations, it was basically impossible for them to backtrack and change strategies that would yield the best result in the long run.</p>

<p class="post-body__p">Which brings me to my second point: I struggled a lot with the mutation strategies. Even slightly changing the ways species mutated resulted in very different outcomes. In the end, a couple of small tweaks were responsible for big improvements:</p>

<ul class="post-body__ul">
<li class="post-body__li">Not favouring winners. When you think about it, an inefficient winner isn’t closer to a final solution, than a player who lost by a couple of hit points. The latter is possibly one mutation away from winning, and doing so in a much more economic way. So that part was removed from rankings</li>
<li class="post-body__li">A more diverse algo was favoured over simple ones. This immediately replaced 3-5 move strategies with 8-9 move ones, and made different mutations appear more frequently in the final solution.</li>
<li class="post-body__li">Keeping the most efficient winner and not mutating it. I can’t quite pin-point it, but I knew that that one species was on the right track, but often I saw more efficient losers take over the population. So I don’t want to take all the winers over losers, but I want to preserve at least some of them.</li>
</ul>

<p class="post-body__p">This somehow allowed me to arrive at my final solution. Curiously enough, the most efficient species didn’t survive over generations, which I expected. Instead, I had to keep track of the best solution in each generation, insted of relying on the most recent one.</p>

<h2 id="coding-style-choices" class="post-body__h2 post-body__heading">Coding style choices</h2>

<p class="post-body__p">I use a lot of OOP here. While inefficient at times, it makes the code so much readable. I see people implementing their solutions in a procedural style, on one file, top to bottom. I on the other hand separate responsibilities, test individual components automatically, and build architectures that allow me to expand the code easily.</p>

<p class="post-body__p">For example, in the Warrior/Wizard simulator: the second challenge relied on the previous one, and it was quite easy for me to reuse the code for both solutions. And there are two parts to each challenge — usually a tweak to the code to account for new requirements is easy and elegant.</p>

<p class="post-body__p">In addition, I riddle my code with assertions. This allows me to make sure that not only the types are correct, but also the values make sense in a semantic way. E.g. if I have method <code class="post-body__code">Character::gainHealth(value)</code>, I make sure <code class="post-body__code">value</code> is a positive integer. No sense in damaging a player by healing them with negative health. Or using magical, healing fireballs with negative damage, for that matter.</p>

<p class="post-body__p">Another thing I used is combining assertions with exceptions. I wouldn’t use that on a larger codebase this way, but there is a certain elegance to just <a href="https://github.com/mlebkowski/advent-of-code-php/blob/main/src/Realms/RolePlaying/WarriorBuilder.php#L48-L51" class="post-body__a">enumerating border conditions in code, without any control statements</a>. Building custom assertion classes would probably achieve similar results in a more mature codebase.</p>

<p class="post-body__p">Named parameters and factory methods also improve code readability a lot. Use them whenever you can.</p>

<h2 id="in-closing" class="post-body__h2 post-body__heading">In closing</h2>

<p class="post-body__p">In the end, Advent of Code, despite being largely about algorithms and structures, is a lot of fun (and warning: it consumes a lot of time). Would recommend!</p>
]]></content>
        </entry>
            <entry>
            <title type="html"><![CDATA[Perfect code]]></title>
            <link href="https://lebkowski.name/perfect-code/"/>
            <updated>2023-06-04T00:00:00+00:00</updated>
            <id>https://lebkowski.name/perfect-code</id>
            <summary>I learned how to write perfect code, and it’s simple too.</summary>            <content type="html"><![CDATA[<p class="post-body__p">I learned how to write perfect code.
Seriously, and it’s not even that complicated. 
And it requires more social and business skills than technical ones.</p>

<p class="post-body__p">Many software engineers, especially the experienced ones, will tell you that there is no such thing as perfect code. 
They have given up hope and accepted that the will never find the holy grail. 
I shifted perspective and turned an infinite game into a finite one. 
This allowed me to stop focusing on code, and move to more important things of software engineering.</p>

<p class="post-body__p">Before I share my recipe, I’d like to clarify what does <em class="post-body__em">perfect</em> means in this context.
You might take the philosophical definition by Antoine de Saint-Exupéry:</p>

<blockquote class="post-body__blockquote">
  <p class="post-body__p">Perfection is achieved, not when there is nothing more to add, but when there is nothing left to take away</p>
</blockquote>

<p class="post-body__p">But there is also a more practical approach: a perfect code is one, which you cannot modify to make it any better.
In other words, by modifying perfect code, you can only make it worse.</p>

<p class="post-body__p">That being said, there are only two requirements your code needs to satisfy to become perfect:</p>

<ul class="post-body__ul">
<li class="post-body__li">it needs to pass your team’s review</li>
<li class="post-body__li">it needs to correctly implement the business cases</li>
</ul>

<p class="post-body__p">Those are the ony two goals.
It’s not about test coverage, architecture, readability, static analysis metrics or the framework used. 
I mean, your team will probably take those into account during review.</p>

<p class="post-body__p">By adding anything more than is required by your peers to accept it, you are possibly overengineering the solution.
If you’re implemented more business scenarios or edge cases, then you ain’t going to need it principle applies.
And you are delaying releasing to production and delivering value to your users or customers, hence your solution becomes less than perfect.</p>

<p class="post-body__p">This explicitly does not mean that the code can remain perfect over time.
When revisiting it at a later date a lot of things will change: your understanding of the domain, technical methods and techniques, your team might grow and have different requirements, or maybe simply new business cases arrise.
You will need continuous refactoring to keep it perfect.</p>

<p class="post-body__p">But at the time of merging to <code class="post-body__code">main</code> this is exactly what is needed, no more, no less. A perfect piece of code.</p>
]]></content>
        </entry>
    </feed>
