
The process of configuring SVN over SSH using private/public key pairs is quite complicated, especially on Windows platform — I couldn’t find a robust instruction on the net, so I’m writing my own. The key principles:
- SVN repository without HTTP/snvserve access, only SSH
- Single svn system user on the server
- Windows client
Step 0: required software
Tortoise SVN is the best SVN client ever made, so I’m sticking to that. PuTTY won’t be used per se, but it’s required for the configuration.
Step 1: generate the key
Run PuTTYgen to generate a private/public key pair. Just use the defaults and enter a blank passphrase (convinience over security, it’s your call).
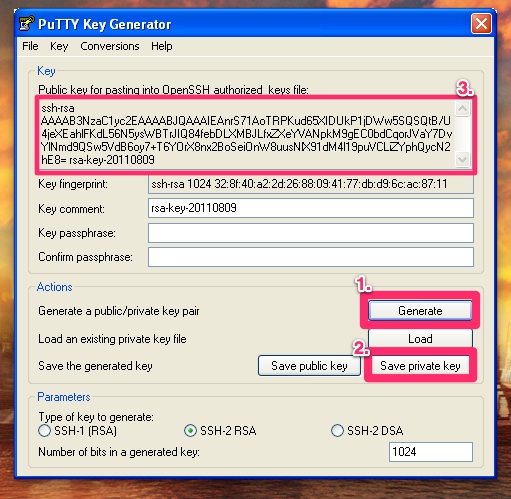
Just follow the on-screen instructions. Save the generated private key, the public key won’t be needed. Just copy the „paste ready” version — this will be used for the server configuration.
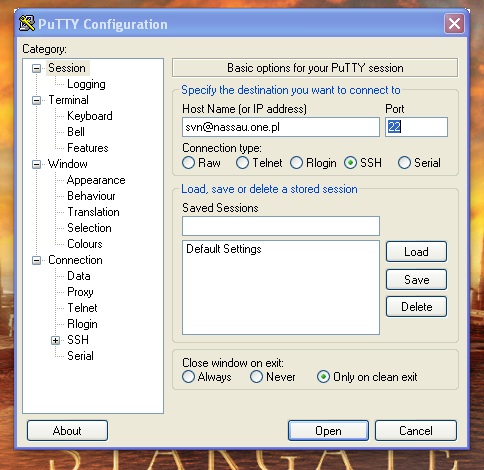
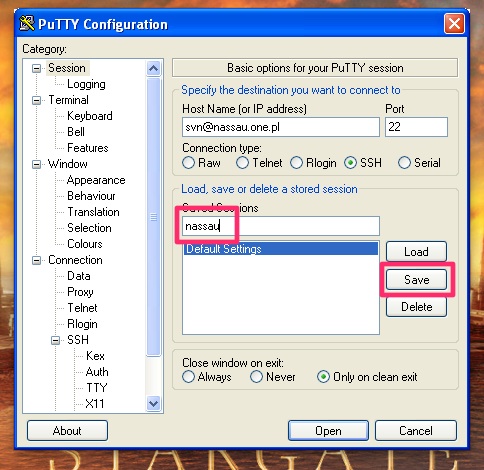
Step 2: configure the connection
You will not need to connect using PuTTY, you will however need to define a new session using it.
Open PuTTY and enter URL in the form username@hostname. Remember, that it’s not your username — it’s the system user used for SVN (see server configuration below).
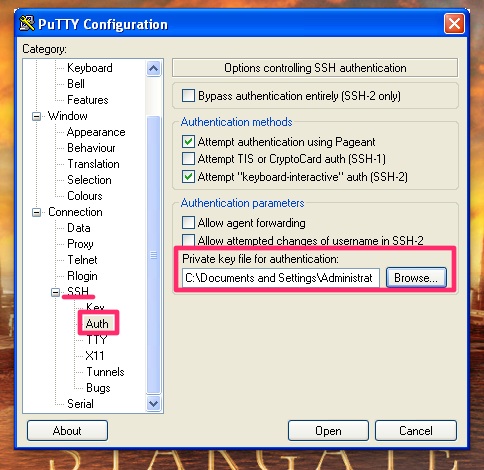
Next select the Connection / SSH / Auth section and use the private key saved in step one.
The last part — this is important — go back to the first screen (Session), name the session and hit „Save”. This way the configuration will be saved to Windows Registry, so that Tortoise can retrieve it later.
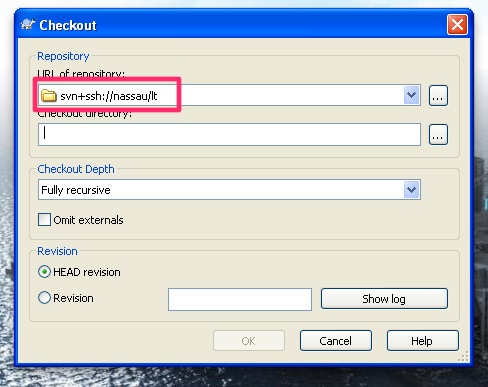
Step 3: checkout using Tortoise
You’re ready to go. You can checkout the repo using URL in form svn+ssh://session-name/repo-name
Linux client setup
In case you’re trying to do the same on a Linux client, the process is far more simple.
Generate the needed pub/priv keys
$ ssh_keygen -q -t rsaSave the key in
/nassau_rsa. You can as well use your other rsa key, but let’s not mix things up.Configure the connection in
/config:Host nassau Hostname nassau.one.pl User svn IdentityFile ~/.ssh/nassau_rsaThe
Useris the system username used for SVN over SSH connections.Send the public key to sysadmin or configure the
authorized_keysyourself.
You can now access your repository via url:
$ svn info svn+ssh://nassau/lt
Path: lt
URL: svn+ssh://nassau/lt
Repository Root: svn+ssh://nassau/lt
Repository UUID: 4d67b713-58a8-4edb-9e91-d78eb345f821
Configure the server
Do some basic setup. Create user, your repository, etc.
useradd -d /home/svn -m -s /bin/bash svn
su svn
cd
svnadmin create lt
Create authorized_keys:
mkdir .ssh
touch .ssh/authorized_keys
chmod 0700 .ssh
chmod 0600 .ssh/authorized_keys
Add user public keys prefixed with line:
command="svnserve -t -r /home/svn --tunnel-user=puck",no-port-forwarding,no-agent-forwarding,no-X11-forwarding,no-pty
Please note:
- replace
--tunnel-uservalue with username associated with the key — this will apear as the commit user - other options are optional, but ensure that the SSH connection is not abused
Example authorized_keys file (newlines created for readability):
command="svnserve -t -r /home/svn --tunnel-user=maciej",no-port-forwarding,no-ag
ent-forwarding,no-X11-forwarding,no-pty ssh-rsa AAAAB3NzaC1yc2EAAAABJQAAAIEAnrS7
1AoTRPKud65XIDUkP1jDWw5SQSQtB/U4jeXEahlFKdL56N5ysWBTrJIQ84febDLXMBJLfxZXeYVANpkM
9gEC0bdCqorJVaY7DvYlNmd9QSw5VdB6oy7+T6YOrX8nx2BoSeiOnW8uusNlX91dM4l19puVCLiZYphQ
ycN2hE8= rsa-key-20110809
